Flat paints tend to have a matte finish and they are most popular for their non-reflective properties, they are also easier to apply and it’s the least expensive choice you can choose from when it comes to painting. Flat paints provide great pastry-looking finishes and are famous for their aesthetic appeal and practical application. Flat paints are also great for bringing out beautiful designs or details and can be used to light up certain dark areas or spaces. Many people prefer flat paints because of their translucent and opaque finish which diminishes glares on surfaces they are used on.
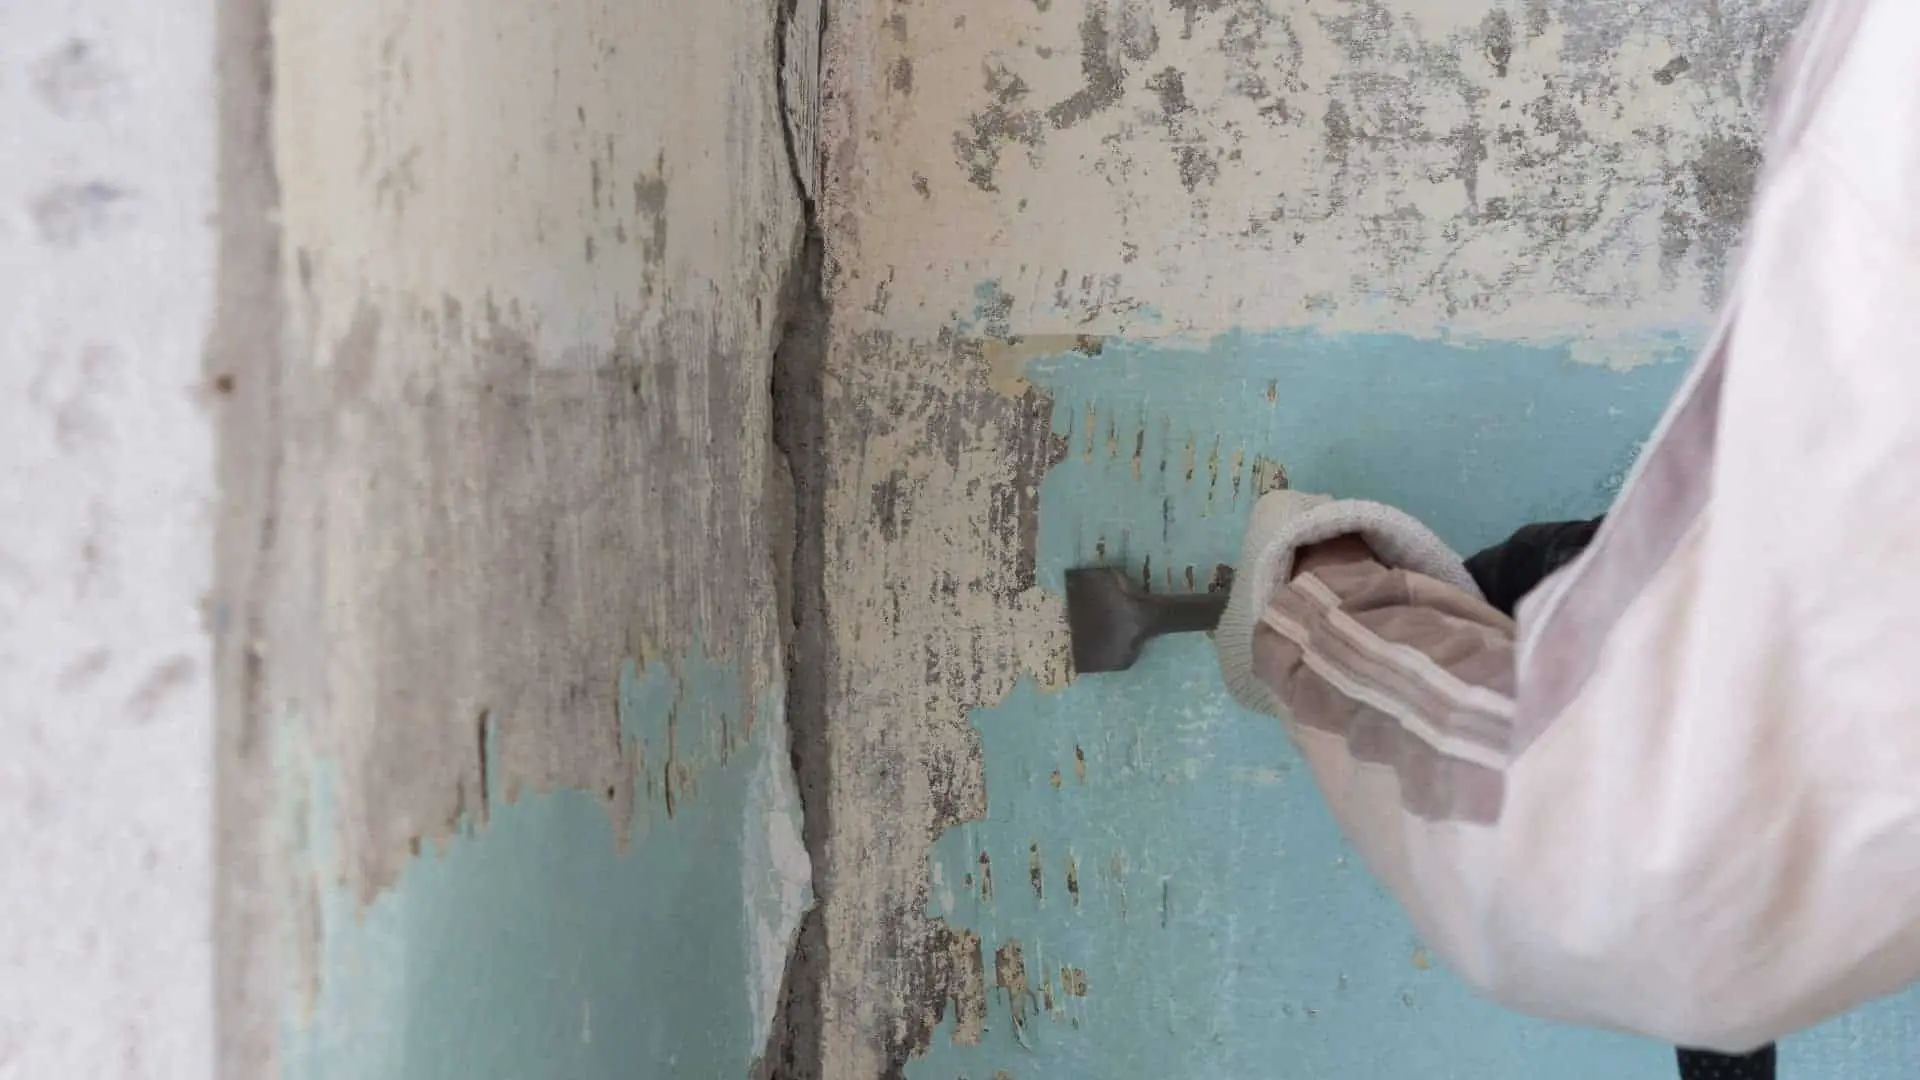
To some, cleaning off a flat painted wall from stubborn dirt can be tricky. Cleaning a flat paint from dirt, stains or fingerprints can be challenging especially when the paint starts to come off with the tool you’re using, a rag, for example, to remove the dirt leaving the wall with a botched look. In this case, the wall may need to be repainted to cover imperfections which is not good if you’re on a budget.
However, some techniques can be used to prevent the botched look and unnecessary spending, and below we list a few:
What you’ll need:
Dish or laundry soap
Cloth or rags
1 bucket
White vinegar
Eraser
Gloves
Water
5 Techniques For Cleaning Flat Paint Walls
1. Water and soap:
Water and soap are great methods to clean dirty spots off your wall without damaging the flat paint on your wall. It is also recommended to clean the wall immediately after any spill is made. To clean flat paint walls from dirt, pour some water into a bucket then add a few drops of liquid soap and stir to make a cleaning solution. Soak a sponge into the solution, and once soaked, squeeze out the excess water and rub the area with the dirt without adding pressure, until the dirt is no longer visible. Rinse the spot with clean water then pat with a towel to dry it, allow about 15 minutes or more for the area to completely dry. Use a fan if needed. Once dry, check the area once again to make sure all dirt was removed and if still notice any additional dirt in the area, repeat the same process once again.
2. Warm water and detergent:
Sometimes all you need is water to remove stains but if it doesn’t work, warm water and detergent should help. To begin, add some water into a bucket then add a few drops of dishwasher detergent to create a gentle solution. Note that you can also use laundry detergent to make a solution, use one spoon of detergent to a gallon of warm water and mix well. Soak a sponge or a cloth into the warm solution and squeeze out excess water, then start by gently rubbing the dirty area with the damp sponge or cloth without adding much pressure until the dirt is no longer visible, then allow it to dry. Once dry, check to make sure the area is clean from the dirt and repeat the process if the area still has some dirt left. It is also recommended to pat the wet area with a towel so that it may dry faster but make sure not to rub the area to not rub off the paint.
3. Eraser sponge:
Another recommended method is the eraser sponge. Soak the eraser in water and then squeeze out excess water. Start by cleaning the area with the dirt with a downstroke motion and sometimes with an up-and-down motion while adding a bit of pressure. Whilst cleaning, notice if any paint is being removed from the area you’re cleaning, if so, you may be doing it too hard. With this technique, the paint should remain intact. Clean until the dirt is no longer visible and allow up to 15 minutes for the area to dry. It may take longer depending on the environmental conditions. After theropod check the area to make sure all stains are removed. If still notice any dirt, follow the same method to remove it. This technique is great for cleaning walls and doors.
4. Water and vinegar:
For a more substantial cleaning, vinegar is a great recommendation, it is considered a natural eco-friendly cleaner that will not damage the walls and you may have some handy. Take one cup of vinegar, usually white vinegar, and mix it into half a bucket of warm water. Soak a clean cloth or a sponge into the solution and gently wipe off the dirt on the wall with an up-and-down stroke motion. Allow to dry for about 15 minutes or more, then double-check to see if all dirt was removed, if not, repeat the same process a second time or until the dirt is completely removed.
5. Wall cleaners:
Foam wall cleaners are another way to clean flat paint walls if you prefer a more industrial approach to cleaning the dirt off your flat paint walls. They are somewhat inexpensive and can be used instead of the household items you may have available like dish soap and rags, although many people would rather choose household items if they are on a budget. They come in spray bottles or wipes. They offer easy-to-spray and wipe-off methods and save you some time. It is recommended to follow the safety instructions available on the product when using chemical products.
Although flat paints are considered to be a bit difficult to clean, they can be accomplished with a gentle cleaning approach. It is recommended to clean flat-painted walls regularly. Cleaning flat-painted walls routinely will keep it looking fresh and bright and it’s a great way to protect the paint too. Use products that are mild enough to use on the walls and won’t damage the paint. As a safety tip, make sure electrical outlets are covered for safety reasons. Do not use anything abrasive or harsh chemicals as this may damage the wall by rubbing off the paint. We hope you find these tips helpful.
Drying the Walls Properly
When tackling the question of how to wash walls with flat paint, understanding the drying process is crucial for achieving optimal results. Flat finishes are notorious for their susceptibility to moisture, which can leave unsightly streaks when not dried properly. To facilitate a cleaner finish, consider using a damp microfiber cloth instead of soaking your walls with water. This method minimizes excess moisture while effectively removing dust and smudges.
After washing, allow your freshly cleaned walls ample time to dry ideally 24 hours if possible. Ensure the room is well-ventilated by opening windows or utilizing fans; this not only expedites drying but helps prevent mold growth that can easily thrive in damp environments. Remember to check humidity levels; higher humidity might require additional drying time or dehumidifiers for optimal conditions. By adopting these careful practices in wall maintenance, you’ll elevate the beauty of your space while ensuring long-lasting results without compromise.
Common Mistakes to Avoid When Washing
One of the most common mistakes when washing walls with flat paint is using too much water. Flat finishes are particularly absorbent, and excessive moisture can lead to streaks or even damage to the paint. Instead, opt for a damp cloth and a gentle cleaning solution suitable for your wall’s finish. This will ensure you’re effectively removing dirt without compromising the integrity of the paint.
Another frequent pitfall lies in neglecting to spot-test before diving into a full wash. Different areas in your home may react differently depending on lighting and wear; what works in one section might not translate well elsewhere. Take a few minutes to test your chosen cleaner on an inconspicuous spot first it could save you from costly touch-ups later. Lastly, don’t overlook drying techniques; using dry microfiber cloths aids in swift absorption, preventing unsightly marks while preserving the appearance of your flat-painted surfaces.
Conclusion: Maintaining Your Flat Painted Walls
Maintaining flat-painted walls requires a gentle touch and a mindful approach to cleaning. To wash walls with flat paint effectively, start by dusting surfaces with a microfiber cloth to remove any loose debris, which is crucial in preventing scratches during the washing process. When it comes time for deeper cleaning, opt for a solution of warm water mixed with a mild detergent; this combination effectively lifts stains without compromising the finish. Use a soft sponge or cloth and work in circular motions of this method reduces streaks and allows you to target specific areas without soaking the paint.
It’s also wise to conduct regular spot checks for scuffs and fingerprints before they set into the paint, early intervention can keep your walls looking fresh and vibrant longer. Keep your tools on hand; using an extendable duster or even a soft-bristle broom can easily reach higher spots while avoiding unnecessary pressure that could mar your flat finish. Lastly, remember that preventive measures like being mindful of touches near door frames or furniture can significantly enhance durability, it’s all about embracing those small habits that make your living space shine effortlessly!
We all want to produce a piece of art that is free of errors. As a DIY person, you aim to create a smooth and clear painting. With that in mind, note that the art of painting requires all of your input to realize desired results, so you should pay attention to the finer details of the whole painting process. This calls for total commitment which may include daily painting practices to master the skills. In addition to that, it is important to mention that to produce the desired piece of painting, you have to prepare adequately.
Any paint you come across is made of a ton of additives that make it suitable for use on a given surface. Floetrol is a good example of an additive in paint that enhances the properties of a particular paint. With that said, what is a paint leveler? Read on to find out more.
Definition Of A Paint Leveler
Paint levelers are also known as paint extenders. They are powdered particles that are majorly earthy which are added to paints to enhance their properties. They allow the application of paint on a given substance to become much easier. Additionally, paint levelers cause the paint to dry out much faster. The paint levelers do not change the basic characteristics of paint.
Composition of paint levelers
Paint levelers(extenders) are mostly solid with varying particles but they are mostly in powder form which enables them to properly blend with paint to increase its(paint) quantity and improve its filler properties. Additionally, they enhance your paint’s applicability properties by causing it to withstand the natural processes of wear and tear.
Importance of paint levelers
Just like other substances, paint contains important additives that contribute to its application properties. So, how important is a paint leveler? Let us take a look at some uses of paint leveler.
Paint levelers protect spray guns from wear and tear
They reduce the amount of time it takes for paint to dry
Leveler additives have other important chemical characteristics when they react with a given paint. They include:
Improved application of paint
Enhanced sticking abilities
Increased film ruggedness
It adds to the bulk of the paint
Choosing your leveling additive
The most common leveling agent is the improved polydimethylsiloxane which is a long-chain polymer. You can not use this additive in its pure state because they are incompatible with other additives found in paint. You Should consider choosing modified additives to improve the leveling abilities of paint. Modified grounding agents can improve the adhesive properties of your paint by stabilizing its form and surface tension.
Problems encountered during paint application
You want to create a near-perfect piece of painting without any unwanted blemishes and if you are a professional painter, your customers expect you to produce “pure gold”. Such results are achievable if you will select the best grounding agent and proper surface preparation before you start painting and this is where paint levelers come in.
That notwithstanding, a lot of times you will encounter a myriad of problems during painting, and this does not mean you know anything as pertains to painting. These are common problems to expect but with adequate preparation, the chances of encountering such problems can be greatly reduced to achieve the desired finish.
The final look of your painting is determined by the nature of the painting you will apply whether you will spray it or use a roller when applying the paint. Additionally, the mode of drying will contribute to the quality of the final piece of your painting. So what problems are you likely to experience during your painting? Read on to discover more.
A characteristic Orange peel appearance
This is most common when doing spray painting and it is influenced by the following factors:
The viscosity of the substance used as a paint leveler.
Spraying parameters such as air and liquid ratio
The surface tension of the solution and the leveling agents used.
Craig-like formations
This is caused by contaminants in the solution that manifest during the drying process. The difference between the surface tension of the paint and impurities can also bring about this formation. Such impurities will affect the surface tension of paint and consequently lower its application properties.
Swellings on the surface
The swelling results due to the trapped air spaces in paints. They may also occur due to the availability of volatile agents in paint resulting in volcano-like formations on the painted surface. Adding paint levelers reduces this effect by acting as a filler to enhance the application properties of your paint.
Slinking
Spraying paint on a surface is the most effective method when applying your undercoat. However, it may cause film retraction on the surface immediately after application in what is referred to as dewetting. The coloring agent supposedly wets the surface temporarily but after a short while, it retracts leaving behind an ugly appearance. This scenario is possible due to a difference between the surface tension of the paint used and the additive.
Any paint you come across is made of a ton of additives that make it suitable for use on a given Floetrol is a good example of an additive in paint that enhances the properties of a particular paint. You will encounter a lot of challenges during the painting process which is why you should take precautions to avoid them.
Paint levelers are also known as paint extenders. They are soluble additives that improve the application properties of your paint. Ensure you choose the right extender for your paint to enable you to achieve your ultimate goal of a clear and smooth piece of painting. The type of leveling agent you choose will affect the time it takes for your paint to dry and this should be taken into consideration. Hope this helps, enjoy your painting!
Frequently Asked Questions (FAQ) About Paint Levelers
1. What is a paint leveler? A paint leveler is a specialized additive that helps to smooth out the finish of your paint, minimizing imperfections and improving surface quality for a more professional look.
2. When should I use a paint leveler? Use a paint leveler when you’re working with surfaces that tend to show brush marks or texture, or when painting over existing finishes that may be uneven.
3. How do I mix the paint leveler with my paint? Typically, you’ll add the recommended amount of leveler directly into your paint can and stir thoroughly. Always refer to the product instructions for specific mixing ratios!
4. Can I use paint levelers with any type of paint? Most paint levelers are compatible with water-based and oil-based paints, but it’s always best to check the product label for compatibility with your specific type of paint.
5. Will using a leveler change the color of my paint? No, adding a paint leveler should not alter the color; it simply enhances application and finish quality without impacting the hue.
6. Are there any special tools required when using a paint leveler? You don’t need special tools; just standard painting supplies like brushes or rollers will work! Just make sure you’re applying evenly for the best results.
7. How long does it take for the leveled surface to dry? Drying time can vary depending on environmental conditions and the type of paint used but generally expect it to take about 1-4 hours before recoating.
8. Can I use too much paint leveler? What happens if I do? Using too much can lead to an overly slick surface that may not adhere well during future coats. Stick to the manufacturer’s recommended ratio for optimal results!
Conclusion
In conclusion, understanding what a paint leveler is can improve your painting projects. You won’t have to deal with the unpredictable results of traditional methods; a paint leveler lets you control texture and finish more effectively. This helpful additive helps you get a smooth, shiny surface, turning an average job into something special and enabling professional-quality results at home.
Moreover, incorporating a paint leveler not only elevates aesthetics but also enhances the durability and longevity of your finishes. By investing time in mastering its application techniques whether you’re tackling furniture restoration or wall remodeling you’ll be empowered to create surfaces that not only look polished but also stand up to everyday wear and tear. So next time you’re preparing for a painting endeavor, remember: embracing tools like paint levelers isn’t just about the product itself; it’s about unlocking your creative potential and redefining what’s possible with every brushstroke.
Have you ever wondered how color affects your mood? Well, the type of color you paint on your wall has a more significant bearing on your daily mood. According to mymove.com, you cannot ignore your room color since it forms the fundamental principles associated with your spirit. On that note, this article will examine the easiest way how to paint a galaxy wall; Read on to discover more insight.
You might want to make a few changes to your room, such as changing the color of your furniture and your walls. When it comes to changing the color of your walls, you need to pay attention to the type of color you apply because, as was mentioned earlier, color significantly affects your inner person.
Changing the color of your walls breaks the monotony of staring at a single color daily. You can paint your wall plainly or be more creative and do a few decorations on your wall to bring a feeling of newness and liveliness to your room. Speaking of creativity, is there a right way to paint a room to look like a galaxy(how to paint a galaxy wall)? Continue perusing to find out.
Painting a galaxy-themed color on your walls involves patterns and decorations that resemble the sky during nighttime. Painting a galaxy wall should not give you headaches; if you are a DIY, you can produce this type of paint if you have the right supplies. So, what materials are needed to paint a galaxy wall? Read on to find out.
Materials Needed
Dark purple paint for the background
Purple paint
Light purple paint
Light blue paint
Brushes
Art brushes
Spray bottle
A picture of a galaxy
Now you have all the essential supplies needed to paint your galaxy wall, and it is time to start your project. Since any form of wall painting can be pretty messy, you need to move any movable furniture and other items to another room or cover them adequately to protect them from paint splashes. Since you will not paint the whole room, you should choose the wall to apply to your galaxy art.
Decide on the most appropriate galaxy theme to use on your wall. You can check online for a variety of galaxy-themed pictures and pick the one that is best for you. Without wasting time, let us get you into the actual exercise of painting your wall to look like a galaxy.
Preparing the Wall Surface Properly
Preparing the wall surface properly is crucial for achieving a stunning galaxy wall that dazzles with depth and vibrancy. Start by cleaning the surface meticulously. Dust, grease, or old paint can wreak havoc on your beautiful new design. Use a mixture of water and mild detergent to wipe down the walls, followed by rinsing and allowing it to dry completely. Once dry, inspect for imperfections fill holes or cracks with spackle, and sand them smooth to create an impeccable canvas.
Next comes priming a step that’s often overlooked but essential for rich colors in a galactic masterpiece. An even primer not only prevents dark hues from bleeding through but also enhances adhesion for the top layers. Choose a matte finish so no reflections interfere with your cosmic artwork later on. After priming, consider adding texture, using tools like sponges or brushes that can imprint swirls reminiscent of nebulae and celestial movements. By carefully preparing your wall surface this way, you’re not just painting, you’re crafting a gateway to another universe right in your home!
Steps involved In painting your galaxy wall
You will realize that painting your wall to look like a galaxy will be much easier by following the steps highlighted below:
Pick a Background theme for your Galaxy Wall Paint
To begin your painting, pick a dark hue to act as your background color. Ensure your wall has a good primer before you start painting the galaxy look.
Make use of pigments like indigo blue and shades of purple as you polish your wall. Start with darker shades of either blue or indigo on your wall, and then continue with shades of green, red, and lilac colors to bring out a conspicuous theme.
This stage will essentially involve adding bits of yellow and white at the bottom to create an intense shade. Note that, too, to achieve a skylike theme, you need to add bright colors to your painting in an appropriate manner and care not to overdo it. You can save a significant amount of time by using paint sprayers to apply paints on your wall.
You are allowed to use ordinary paints; however, ensure you give them sufficient time to dry before going on to the next step.
Be creative with the images to use
The internet contains many images where you can choose the most appropriate to use. Use chalk to make sketches of pictures on the wall.
You want your wall to be as presentable and as appealing as you possibly can; pick images that can only be found or have a relation to the sky. To give you a clue, think along the lines of spaceships, planets, asteroids, and comets.
You need to produce a near-perfect image, so you should ensure you use chalk to see how the image appears before using paint.
Fill the sketches of images you have made with the color white to make them look natural in the dark background. Use the right size of brushes when drawing your pictures to minimize the chances of distorting your images.
Drawing the Constellation
As we mentioned earlier, you need to be more creative. You can find many images on the internet to give you a rough idea of how a constellation looks, and try to draw on your galaxy painting.
You can use your chalk to make an image of a constellation on your galaxy wall.
Work your way through the constellation by connecting dots with white to bring out the actual image of a constellation.
Use paint to draw the actual images of the heavenly bodies you sketched earlier
Make the images appear natural by applying paint on them accordingly. Note that you need to be more careful at this stage because any mess you create will take you back to the beginning of the whole exercise.
Use a fine brush to create a clear impression of the clouds in the background to give your painting a lively look.
Use the most applicable colors to give you an accurate picture of a galaxy sky. You can research online for the right shades of colors, but the standard ones include: blue, red, and green. Luminous colors can help create a feeling of being in the actual sky and experiencing the surroundings.
Since you Want your room to have a different and fulfilling look, you can explore other surfaces that you think may deserving of having the face of a galaxy; try painting your ceiling by following the above instructions and seeing how marvelous it becomes.
Painting your wall to look like the sky at night will undoubtedly give you a certain level of tranquility and raise your spirits. So why don’t you try this magic and see what you have been missing? Enjoy your painting!
Tips for Maintaining Your Galaxy Wall
Maintaining your galaxy wall can be as crucial as painting it. Regularly check for any signs of fading or wear, especially if you use lighter paint colors in high-traffic areas. To rejuvenate your cosmic masterpiece, keep some paint on hand for touch-ups, this not only preserves the vibrancy but also allows you to add new stars or nebulae over time. When cleaning, opt for a gentle cleanser and soft cloth to avoid damaging the intricate layers you’ve created.
Consider integrating lighting options that enhance the galaxy effect. LED strips can create shifting colors that mimic a starlit night sky. Additionally, rethink how furniture and decor interact with your mural select items that complement rather than overshadow this statement wall. Finally, rotating artwork or prints related to space themes can spark new visual interest without overwhelming the celestial scene you’ve crafted. Embrace change as part of maintaining your galactic oasis!
Conclusion: Transform Your Space with Art
Transforming your space with art is not merely about decoration, it’s about breathing life into your environment. A galaxy-themed wall can serve as a captivating focal point, inviting curiosity and wonder into any room. Imagine stepping into a space where cosmic colors swirl and twinkle this can be achieved through the simple act of painting. Choosing materials like sponges for texture or techniques such as splattering to create stars can elevate an ordinary wall into a celestial masterpiece.
Furthermore, embracing artistry in home decor fosters emotional connections and enriches personal narratives. Your galaxy wall could symbolize exploration, inspiring you to dream big every day. Incorporating varying shades of blues, purples, and whites not only adds depth but also influences the mood within your space. So grab that brush with confidence! Experimentation is key: mix colors freely and allow spontaneity to guide you who knows what stellar creation awaits? Ultimately, art transforms mere walls into stories worth sharing, igniting an everlasting sense of awe in your everyday life.
Drying paints and curing paints are two different important parts of the painting. This article is a complete guide about how to dry paint fast.
Are you planning to spruce up your room? Changing wall paint is one of the fantastic ways to transform your room. Paint is an important and easiest job in renovation projects, and it is budget-friendly too if you are doing it yourself. But you need to follow some pro tips to get perfect results without any professional help and don’t want to turn this project into a nightmare.
Introduction: The Need for Fast-Drying Paint
In today’s fast-paced world, the demand for efficiency permeates every aspect of our lives, even in painting projects. Whether you’re a DIY enthusiast or a professional painter, the need to minimize downtime is essential. Fast-drying paint not only speeds up project completion but also allows for quicker corrections and layers, ultimately resulting in a polished finish without sacrificing quality. Imagine starting your next creative endeavor and being able to apply multiple coats within hours instead of days. This can transform your workflow significantly.
Moreover, environmental factors such as humidity and temperature fluctuations can complicate traditional drying processes. Fast-drying paint mitigates these issues by adapting to varying conditions, giving you more flexibility regardless of when inspiration strikes. Additionally, with advancements in technology and formulation, modern paints are designed to provide excellent adhesion and durability while maintaining quick-drying properties. By mastering techniques on how to dry paint fast, you empower yourself not only to create more efficiently but also to experiment more freely breathing life into your artistic visions without unnecessary delays.
Understanding the Paint-drying process
The paint drying process comprises evaporating the solvents from your paint coating, leaving your paint dry to the touch. Paints are made of pigments, binders, solvents, and additives.
Over the past decade, the market has been crammed with a huge range of paints. Each type of paint takes a different amount of time and techniques to dry faster. So what method you use to dry your paint faster depends on the type of paint that you can use for this job. First, we will go through the types of paints and their characteristics to give you a better understanding.
Enamel or Oil-Based Paints
Oil-based paints are thicker and have a high level of volatile organic compounds, and take more time to dry. It can take up to 24 hours to completely dry, and you have to wait overnight to apply the second coat.
Water-Based Paints
Water-based paints have a low level of toxic chemicals and are prone to fast drying (can take just 4 hours). These paints are easier to use. Latex and acrylic paints are the two main types of water-based paints. Whatever paint you are using, it sometimes becomes difficult to wait to apply the second coat, and there is nothing more boring than waiting. If you want to move faster to get this job done, here are some easy tips and tricks on how to dry paint faster!
How To Dry Paint Faster?
In the following article, we will focus on professional tips that will help to dry paint faster. This article will exhibit only the paint-drying process.
Thin Coats
Apply thin coats! The less paint on the surface, the faster it will dry. Most people apply as much paint as they want at once; abstain from doing that. Multiple coats work better than one thick coat. A thin coat tends to dry faster, and you don’t have to wait longer to apply the second coat.
Use Heats
You can also opt to use heat sources. It is the most useful method during cold weather. You can use:
Heat Guns
Hair Dryers
Space Heaters
But make sure you do not overheat the area as, in most cases, it can cause cracks, especially when using paints with a crack finish as it could widen the cracks.
Wall by Wall
Go for this amazing technique of painting one wall at a time for the first coat. Then go for another wall while the coat of the first wall dries. Always try to finish applying the first coat to all the walls, so that your first wall is ready for the second coat.
Ventilation System
Make sure to have a good air circulation system in your area. It will speed up the drying process. Do not close the doors and windows during and after painting to keep the air moving. You can also keep room fans running so that fumes from the paint can escape.
Using Drying Agents
There are many special agents available in the market. These drying agents are really helpful for drying paints, especially oil paints or enamel paints. These agents are useful between coasts of finish, even in damp or cool weather, and reduce drying time between multiple coats. Most people use these products with varnishes, oil-based paints, and drying puffy paints. Some of these drying agents are:
Linseed Oil
Cobalt
Turpentine(Thinner)
Paint at Low Humidity Levels
Suppose the atmosphere has a low humidity level. In that case, your paint dries quickly as humidity will delay the drying process, so if you have a dehumidifier or air conditioner in your room, turn it on. If you are painting an outside wall of your house, choose the least humid day to paint your wall.
Pre-Heat the Surface
Pre-heat or increase the temperature of the surface before applying the first coat of paint. But be careful not to make it too hot; keep it warm. This trick will surely pace up the drying process. It is mostly applicable to smaller areas like furniture.
How To Dry Puffy Paints Faster?
Are you planning some paint crafts on your furniture and worried about how to dry puffy paints faster? Puffy paints allow you to create craft designs on different surfaces, including furniture, fabrics, and paper. It usually takes 15 to 30 minutes to dry, depending on the amount of paint you have used. There are many methods on how to dry puffy paint faster, but be careful; it can be dry outside and still be wet from inside, so make sure to work a little bit more.
Take out the painted item outdoors and keep it under sunlight.
Heat guns or heat dryers, this method is best to set dry the puffy craft paint.
Final Thoughts
Not just the walls, you can also use paint to brighten up your old furniture. Consider sanding down a tired dresser or nightstand and painting it a bright, fun color. Some new hardware and you’ll have a brand new piece of furniture in your room! How to make paints dry faster depends on the type of paint you’re using and the surface being worked on. We have explored which paint dries faster and which one needs the involvement of drying agents for professional-like results.
However, paints vary in their characteristics, and there are some special techniques to fasten the drying process. It is best to choose one with a quick-drying ability on any surface wall, furniture, canvas, or fabric. The other factors involved in making paints dry faster are air freely circulating in the area (ventilation), heat sources, and lower humidity levels.
Now you have become a pro by learning these useful tips, and we hope that it has made your home improvement project easier.
Common Mistakes to Avoid When Drying
One of the most common mistakes when drying paint fast is applying thick layers, which can significantly prolong drying time. Instead, opt for thin coats, they not only dry more quickly but also improve the overall finish by minimizing drips and runs. Another vital tip is overlooking environmental factors such as temperature and humidity. Painting in a humid environment can lead to prolonged drying times, so consider using fans or dehumidifiers to create an optimal space for your project.
Another pitfall involves rushing the process by forcing accelerated drying methods like using heat guns or hair dryers, which might seem effective but can cause uneven surfaces or even bubbling if not handled carefully. A better approach might be to choose quick-drying paints formulated specifically for speed without sacrificing quality. Don’t forget about ventilation ensuring good air circulation can enhance evaporation rates, speeding up the entire drying process while avoiding that suffocating paint fume dilemma. By sidestepping these common errors, you’ll master how to dry paint fast without compromising on quality!
Conclusion: Mastering Fast-Paint Techniques
In conclusion, mastering fast-paint techniques can significantly enhance both your creativity and productivity as an artist. Learning how to dry paint fast not only allows you to layer colors more efficiently but also enables you to experiment fearlessly without the dreaded waiting time. Innovative drying methods, such as using a hairdryer on a low setting or investing in items like quick-dry mediums open new avenues for blending and creating textures seamlessly.
Embracing these techniques encourages spontaneity in your work, pushing boundaries that often lead to unexpected masterpieces. Consider developing a routine that incorporates swift painting practices, which can transform even the most meticulous projects into dynamic expressions of art. In this fast-paced world, adapting your skills will ignite your passion and elevate your artistic journey turning what once required hours into exciting creations made in mere moments. So grab those brushes and let the magic of speed inspire you!
Are you curious to know how to apply modern master metallic Paint on metal? Here I’ll tell you the best method to apply modern master metallic Paint to your metal.
Introduction:
Do you want to make your home attractive by painting in a new way? Of course, you want to! Do you think you’ll need to hire a professional for it, but you can’t afford his fee? Congratulations!
We have delivered numerous ways by which you can make your home worth-inspiring easily. But how will it be possible when you have a low budget? You will have to work smartly and be creative.
You can use Perfetto Metallic Paint both for the exterior and interior. It has excellent self-cross-linking capabilities that make it capable enough to do work on different materials. Perfetto Metallic Paint is best for outer surfaces. It’s mainly for stuff and hard surfaces. The question of the best and easiest method to use Paint is commonly asked. The answer is metallic Paint. As various Paint has problems being rolled, this Paint resolves the problem by successfully rolling it when used. Even newbies who are unaware of complex methods and have little experience can take the best benefit of it.
Preparing Your Surface Properly
Preparing your surface properly is the foundation of a successful painting project, especially when using Modern Masters Metallic Paint. Start by ensuring that your chosen surface is clean and free from dust, grease, and peeling paint this might mean washing it down with soap and water or lightly sanding it for better adhesion. A smooth texture allows the metallic pigments to reflect light beautifully, enhancing that coveted shimmer.
After cleaning, consider applying a primer designed for metallic paints, this not only increases adherence but also helps in achieving an even coverage. For porous surfaces like wood or plaster, a good sealer can create a barrier that prevents absorbency issues, which could dull the final finish. Don’t overlook details such as filling in cracks or holes; doing so will ensure an uninterrupted metallic sheen across your entire project. Remember that proper preparation isn’t just about aesthetics it sets you up for longevity and durability in your paint job!
Selecting the Right Tools and Materials
To apply Modern Masters Metallic Paint, you’ll need the following tools for the best results:
Synthetic Bristle Brush
Angle Brush
Microfiber or Synthetic Roller
Foam Roller
Plastic Trowel
Thoroughly stir the paint before application to ensure metallic pigments are evenly distributed.
Sanding Sponge or Sandpaper
Cleaner
the best method to apply modern master metallic Paint to your metal
The tips will apply to the raw metal. You don’t need to work on metal hardware such as pulls or knobs because they’re already clear and attractive. You don’t have to prime them. Mostly, you can apply metallic Paint directly over this surface. To give the best appearance, you have to clean raw metal surfaces with the best solvents. You must scrub that with steel wool and a suitable solvent like Denatured Alcohol and lacquer. You can also use steel wool for this. For your protection, you should wear gloves.
After cleaning, you have to prime your metal, and you must have to use a good metal primer for this because it’ll specifically decide the appearance of your metal. Don’t forget to protect yourself with good ventilation and respiration when you intend to handle these types of solvent-based products.
Lay down a quality water-based primer after premiering raw metal.
If you want to work on the shiny material that already has some finish or topcoat on it. It’s best to use 180 grit paper for sanding the metal for ruffing it up. Here you can also give an inspiring tooth effect. After doing this, use a good primer to prime and wipe clean.
After this, apply Perfetto Metallic Paint in a way that suits you the best. Blot or Spray with a Sea Sponge because metallics need to be sprayed better.
That was the answer to how to apply modern metallic Paint. You don’t have to invest money to buy your new furniture. You can make your furniture shining and outstanding by following these innovative and simple techniques. So, start from today. It’s a way to enhance your creativity. That’s all about painting your furniture, but some other things in our home need to be modified. It’s another technique for applying metal paint to your fixtures and furniture.
You can brush metallic Paint, but the brush lines are more visible than basic house paint. The best way to apply metallic Paint to fixtures, furniture, accent pieces, and hardware is to stipple and pounce it by using a brush. After research, we’re capable of recommending an under-range “chip” brush that works amazingly. “Pouncing” or “stippling” is the best technique to use while applying the Metallic Paint along with the corners of walls or along molding edges where the roller can’t work due to its limited extension. You can also use sea sponges to apply metallic Paint.
It’s all about applying modern master metallic paint. If you love creativity, you’ll surely love these tricks. Hopefully, you’ll be inspired by the results. The one thing you must remember while painting is to determine the sensitivity of the surface. As you read above, the conditions are different for rough and smooth surfaces ( for raw and metallic surfaces).
Common Mistakes to Avoid
One common mistake when applying Modern Masters Metallic Paint is neglecting surface preparation. A clean, smooth surface is crucial for the metallic finish to shine its brightest. Failing to sand or prime can lead to uneven textures and blotchy results, diminishing the beauty of the metallic sheen. Take a few extra minutes to ensure your surface is ready; it’s an investment in achieving that stunning look you desire.
Another pitfall is rushing through the application process. Metallic paints often require a gentle touch for even coverage. Applying too thickly can result in drips and an undesirable texture, while rushing between coats may cause streaks or inconsistencies in color depth. Patience pays off allow proper drying time between layers to achieve a professional-quality finish that truly highlights the paint’s luster. By steering clear of these common mistakes, you’ll unlock the full potential of your chosen hue and create a breathtaking transformation in your space.
Conclusion: Transforming Spaces with Metallic Paint
When contemplating a home transformation, metallic paint emerges as a transformative tool that goes beyond greys and whites. With its shimmering finish, it can turn mundane surfaces into statement pieces that capture light in mesmerizing ways. A correctly applied layer of Modern Masters Metallic Paint not only enhances aesthetics but also adds depth and warmth to the ambiance of any room, infusing spaces with an unexpected luster that invites curiosity.
To truly harness the power of metallic finishes, it’s essential to understand application techniques. Start with high-quality brushes or rollers designed specifically for this type of paint; their texture allows for an even distribution that showcases the paint’s reflective properties without streaking. Additionally, experimenting with different base colors can yield varied results from bold statements to subtle elegance enriching your project further while opening up endless creative possibilities. Elevate your décor and create breathtaking spaces by letting metallic hues inspire bold expressions within your home’s design narrative.
When it comes to transforming tired furniture into stunning statement pieces, chalk paint is a revolutionary tool in the hands of DIY enthusiasts and professional painters alike. The quest for the perfect chalk paint can be daunting with so many brands flooding the market, each claiming to be the best. In this comprehensive guide, we have sifted through countless options to bring you an expertly curated list of the top 7 best chalk paints for furniture that promise to elevate your next project from mundane to magnificent.
From vintage shabby chic vibes to modern sleek finishes, these handpicked chalk paints offer a spectrum of colors and textures, ensuring there’s something for every style and taste. Whether you’re a seasoned pro looking for superior coverage and durability or a beginner seeking user-friendly formulations that guarantee exceptional results, our selection caters to all preferences. Get ready to dive into this detailed exploration of the finest chalk paints on the market, and discover which one will become your go-to companion in your furniture transformation journey.
Who Needs This Product?
Chalk paint is ideal for all kinds of painters, from more experienced ones to first-time painters. Considering how Chalk painting requires a minimum skill set, with a little bit of research, you can equip yourself to have a professional finish on any furniture you prefer.
What Readers Will Get Ahead
Finding the best one in the market can be the most intimate choice you’d ever make. So, here’s a complete guide that breaks down all the concepts, the best chalk paint for furniture, and buyer’s guide, and provides a solution to all paint-related problems. So, let’s dive right into it!
7 Best Chalk Paint for Furniture
Retique It Chalk Furniture Paint by Renaissance DIY, 16 oz (Pint) – Best Overall
KILZ 4804 Interior Chalk Style Ultra Flat Decorative Paint for Furniture – Best for Indoor Purposes
Rust-Oleum 285140 Ultra Matte Interior Chalked Paint – Best for Coverage
Retique It Chalk Furniture Paint by Renaissance Deluxe Starter Kit – Best for Art and Craft Projects
FolkArt Home Decor Ultra Matte Chalk Finish Acrylic Craft Paint Set Formulated – Best for Beginners
KILZ L540746 Chalk Spray Paint for Upcycling Furniture – Best for Thin Paints
Rust-Oleum 302595 Chalked Paint Spray, 12 oz, Serenity Blue – Best in Effectiveness
Instead of doing a full house redo, you can count on this highly easy-to-use Retique It Chalk paint to freshen up your cabinets with a pop of color or even go for neutral tones for that ever-needed elegant look. The formula glides on the surface just fine and gives you the freedom to choose from over 4 colors ranging from neutrals to oh-so-bright ones.
Made in the USA, this paint allows you to prevent scuff and scratches regardless of how many kids you have at home. In addition, it offers superior coverage, which lets you get solid-looking paint in just 1-2 coats. With little prep work, this paint is specially formulated for furniture cabinets and home decor to help give a personal touch to everything you do.
It is an excellent choice for both exterior and interior furniture projects. However, it is recommended for outdoor projects to use a marine finish topcoat like Politique It right before applying the clear wax to help secure the color in place.
That’s not it; it dries within 30 minutes to get you the contemporary finish that you have been longing for. What makes it a great choice for creative DIYers is how the matte finish lets you distress the color (if desired) for that artsy look. As for practicality, it is hypoallergenic with no small, Ultra-low VOC (Volatile Organic Compounds) and is easy to clean up with just soap and water for added perks.
Features
You get to have a final look in just 1 to 2 coats.
It offers a silky, chalky, and smooth finish that feels gentle on the tips of your fingers
It contains no toxic materials to make it safe for indoor purposes
The thick and self-level coverage make it a convenient choice to have
Pros
One of the many reasons why this paint takes the lead is how much great durability it offers. Weekly parties can expose your furniture to scratches and damage by the guests. However, with this, I still haven’t found any scratches.
At first, it was easy to apply and gave a smooth look in just two coats without the need to smoothen the surface by sanding. The 100% recycling coating in a chalky smooth finish makes it a safe choice with zero emissions for your home.
Cons
The paint creates a mess while applying. Also, if you are a newbie, it can be hard to find the ratio of dark to chalk paint to let it spread evenly across the surface.
2. KILZ 4804 Interior Chalk Style Ultra Flat – Best for Indoor Purposes
With 14 different shades, this water-based Chalk paint formula is everything you need to experiment with your furniture. Whether it is the dark tones you love or the bright, refreshing ones, it can add any ascent to your room. Thanks to its smooth application, it wouldn’t be a surprise if you ended up painting the entire house with this.
The paint can be used to cover up old or new wood, concrete, glass, wicker, and cast stone for added convenience. Unlike any other type of paint, you don’t have to worry about the surface before painting it. The ultra-matte paint formula can help give chic vibes and offers a durable overall finish. I love this specific chalk paint because it goes on thick and provides unmatched coverage to make this hectic task seamless for you.
However, it is best to make sure the paint goes on clean and dust-free furniture to have a smoother look at the end. You can easily touch the paint after 1 hour and recoat it after 2 hours for your desired finish. Another thing to bear in mind is that the paint is tinted with colorant, so it’s never a bad idea to stir it well before use.
Features
The ultra-matte texture is ideal for small interior furniture
Offers x100 coverage to improve convenience
It comes in 1 quart of paint
Should only be used for indoor purposes
Can add character to anything you apply this to
Pros
Using the wide array of color options, you can easily add a pop of color to any surface you may like without breaking a sweat. As it is chalk paint, you don’t have to prep the surface besides cleaning it to get the best results. However, what makes it stand above the rest is the overall professional finish that distinguishes this paint from most of the brands out there.
Cons
Compared to most other chalk paints, this one has slightly thinner formulas which means you may need to go overboard with the layers. In addition, although it offers a wide range of colors, it lacks some of the basic colors for people who are only looking to upcycle their furniture.
3. Rust-Oleum 285140 Ultra Matte – Best for Coverage
Regardless of whatever surface you may have, this Rust-Oleum Ultra Matte Interior Chalked Paint has got it all! You can use it on a wide variety of surfaces ranging from canvas, and ceramic to metal for that gorgeous vintage look. In addition, the low-odor latex formula is easy to clean and dries in just about 30 minutes for an easy application. This is, in fact, one of the best things about Rust-Oleum, as you can finish off the entire project in just a few hours.
It results in zero-emission and still a professional finish. It can cover about 150 feet easily, and the one-coat coverage means you can also go ahead with a distressed look to complement the rest of the furniture.
However, according to a few chalk paint experts, it’s best to sand or light scuff high gloss surfaces before application. You can also try 1-3 even coats with 30 minted gaps each. The eight classic colors are everything you need to color your favorite surfaces and make them a statement in the room. It can be used straight out of the paint can, which means no mixing or stirring is required. In addition to that, the ultra-matte, velvety finish, and excellent adhesion make this Rust-Oleum paint a must-have at home!
Features
Made for interior purposes only, which makes it a safe choice to have
The 30 oz can is big enough to cover 150 sq ft of surface area
It can be a great way to DIY projects and upcycle your furniture.
It is also available in Chalked Spray and Chalked Glaze to help you get your ideal finish.
Pros
If you are looking for ways to rejuvenate your house, nothing can beat this paint in a wide range of colors and textures, giving a Chippy look with slight traces of vintage. You can rest assured that it will stick to any surface like metal, glass, and ceramic.
You can count on trendy colors to paint your furniture paste and ensure to keep it clean using its easy-to-clean properties and wipe it off using soap and water. If you want a product available in a wide array of color options, this one is your best bet to go.
With this, it’s possible to get a unique look by simply building up the layers. For added protection, count on the Rust-Oleum Chalked Clear Protective Topcoat after the painting application.
Cons
The cans came dented for some customers, which led to a mess and overall poor experience. However, this can be prevented by making sure you got the right can and asking for a return/refund if you didn’t.
4. Renaissance Deluxe Starter Kit – Best for Art and Craft Projects
With just 1 to 2 coats of this amazing paint, you can rest assured to have an incredible finish that will last for years. Regardless of how many objects you may have, this Retique It Chalk Furniture can be your companion to make the process more enjoyable for you. Go for 1 to 2 coats depending on the coverage of your surface, and let it dry for up to 30 minutes for a contemporary look.
It can work perfectly well for outdoor and indoor purposes as well a few arts and crafts project spots make it your go-to paint for anything you need. It is easy to apply and features a chalky matte finish for the exact look that you are going for. The exceptionally well durability is eco-friendly and safe to do your part for the goodness of the world.
The low odor means it contains zero emissions and can be worked with kids around. Although it is recommended to apply 2 coats, using 1 is usually enough if you manage to get the right application on the first try. In addition, the paint suits people with allergies and VOCs as it’s hypoallergenic to nature, meaning you don’t have to worry about your allergies acting up due to the chemical compounds present in the paint.
The formula is built with a primer, so you don’t have to worry about prepping the layer before going on with the single stroke.
Features
The zero VOCs make it safe to use indoors as well as outdoors
Durable to water
The thick coat is everything a beginner could want to ace his first paint job
Virtually no odor
Pros
The paint is made up of the highest quality ingredients to make sure you never compromise with the final look of the paint. The quality is so good that you can easily distinguish Retique It from the rest of the paints out there. This is because they are 100% acrylic coating, it offer only premium quality ingredients.
Cons
Although many people enjoyed the entire kit, not many people were fans of the color selection. It can also be slightly more expensive for people who want to paint their furniture under budget.
5. FolkArt Home Decor Ultra Matte Chalk Finish – Best for Beginners
The convenient size of the paint includes 9-2 oz bottles of chalk paint. With a wide array of color options, you can always mix and match to create a masterpiece of your own. The ultra-matte finish, once dry, offers versatile neutral colors with an easy-to-distress ability for added satisfaction.
Besides that, you can always feel free to use it on different surfaces to give a look you prefer and do an easy clean-up once you are done with the cleaning process. It eliminates one of the most concerning points about chalk paint which is a mess.
The water-based paint creates minimal mess during the application process, easily removed with soap and water. The trusted brand has been known for providing excellent quality paints to suit real experience and skill levels.
If you think that’s enough, wait till you find out how the nontoxic creamy consistency is exceptional for blending and shading for an overall professional and smooth look.
Features
It can be used on any surface interior or exterior furniture
The 2 Fluid onus is enough to cover large objects
Known for offering exceptional durability that will last for some solid years
Easy to apply process is ideal for beginners
Pros
The paints dry to an ultra-matte finish in just 30 minutes so you can wrap up the task in no time. You don’t have to prime or sand the surface before the application process for your convenience. Thanks to the vivid colors, you can rest assured to get a refreshing look to your home to complement your house perfectly.
Cons
There have been a few complaints about receiving leaky paints which ruined the whole experience with the product. Therefore it is recommended to rigorously look for the right paint before you get it off the box and start painting.
6. KILZ L540746 Chalk Spray Paint – Best for Thin Paints
Need to upcycle your furniture? KILZ Chalk Spray Paint is packed with just the right features that can instantly elevate your house’s appearance. It helps add a personal touch to all the boring furniture and brings out the best of creativity in you.
The quick-drying matte formula can get into the intricate details and is ideal for tiny and valuable furniture. In addition, it can cover both indoor and outdoor projects made up of metal, cast stone, wicker, and metal without adding on extra prep for you.
The coverage rate of this paint spray is 12 sq ft, but this can differ depending on the surface texture, application method, and porosity. If you want to go the extra mile, nothing can be the finished look of paint once you apply the KILZ Clear or Dark Sealing Wax to lock everything in place and enhance appearance.
After the painting application, you can easily use water and soap to clean up the mess and enjoy the new masterpiece that you created in just a few hours.
Features
The chalk paint dries in an hour, and the next layer can be done in 2 hours
It covers 100 sq feet per quart
12 oz. Aerosol
It can be used for both interior and exterior purposes
Offer a matte/flat finish
Pros
The comfort tip of this excellent spray prevents finger fatigue. Depending on the surface texture, it can be an ideal application to cover a large surface area without breaking your sweat. Thanks to the spray application, you don’t have to worry about The comfort tip reducing finger fatigue. The coverage rate is 12 sq. ft. per can, depending on the surface texture, porosity, and the way you apply the paint.
Cons
This paint is a bit hard to mix when I first tried out the paint. Therefore, if you are DIYing it straight out of the bottle, expect to experience the same.
7. Rust-Oleum 302595 Chalked Paint Spray – Best in Effectiveness
If lightning-fast drying paint is your best bet, this Rust-Oleum Chalked spray is all you need. First, it creates a vintage look using a wide range of colors for that gorgeous timeless look. Then, using the thick consistency of the oil-based formula, it hides all the past flows of your furniture.
In 20 minutes, you can rest assured to get a complete look with excellent adhesion and ultra-matte beautiful finish to get your desired look. It covers 12 sq ft, and the outstanding adhesion goes on smoothly with minimal prep.
Features
The velvety smooth finish is easy to achieve with the spray paint
Better coverage than most of the paints out there
You can spray at any angle and still get the best results
It can be used for interior furniture purposes only
Pros
You can easily rejuvenate the look of your house using the refreshing, bold colors and get your room Instagram-ready in just a few hours. It can be used on any surface you have, from ceramic to metal, and still, the best results. In addition, the application is safe to use, so you don’t have to put your health at risk while spraying this on furniture.
Cons
Like most spray paints, this one does create more mess than usual, but with a little bit of practice, I think you can learn to paint it without creating a facade at home. Besides that, Some customers review sprays with a clogged tip that makes it difficult to get a smooth finish.
Best Chalk Paint For FurnitureBuyers Guide And Things to Consider Before Buying
Now that you are aware of the best chalk paint for furniture available in the market, it’s time you cut through the surface-level information and find out what really works for you. Here are some of the things to consider before you dive in headfirst to buy the best chalk paint for furniture.
Furniture You’re Painting
The furniture or surface you’re painting plays a significant role in deciding which paint suits the best for your purpose. For example, chalk paints are mainly used for decorative purposes and are more quick and easy to apply when compared to other types of paints. However, they are prone to getting dirty and chip, especially when it’s furniture you use frequently.
Thus if you are on the market to look for chalk paint, it’s best you also look into some good wax or polyurethane finish to get a lasting matte finish that is likely to stay with you for as long as you want.
Method
This decides whether it is paintbrushes that are your best friends or spray cans. If you want it quickly to refresh your furniture or perhaps hide flaws in your current furniture, you can never go with spray paints as they are quick, easy, and dry in no time.
They don’t require any sanding and can be nooks and corners to cover everything Whereas, paint using brushes gives a more professional feel with maximum coverage to cut. They also give long-lasting results.
Color
As we all know chalk paints are known for their aesthetic benefits. So if you are on the hunt for them, chances are, you are finding ways to elevate the appearance of your house. If this is the case, make sure you are perfectly aware of the colors you want to complement the rest of the furniture, AND then decide which paint color would suit your requirements.
Finish
The finish isn’t just associated with the look of your paint. It also determines how long your paint is going to last. Gloss paints have a more contemporary feel, while matte ones give a more shabby-chic look to meet your taste. As far as practicality is concerned, glossy or semi-gloss paints are easier to wipe with a wet cloth than chalk finishes.
However, with the use of a topcoat, you can clean any paint without having to worry about smudging it off.
Preventive Measures That You Should Take Before Buying Or Applying Chalk Paint on Furniture
Before ordering pain, make sure to use a measuring tape to properly measure the surface area you will cover with the paint. For example, if it’s a table, how big is it and how many will you do? It’s best to order all the quality at once instead of waiting for the first bottle/tin to finish before ordering a new one.
Although prepping isn’t needed in chalk paint. However, the surface must be clean and there is no muss or dust to help get a smooth and durable finish.
To avoid creating a mess, you should lay a large disposable plastic underneath the furniture you are painting.
The mark of the brush plays a crucial role in covering the tiny corners of the furniture. Here remember the bristles of your paintbrush shoulder be flagged in multiple lengths to form a slim tip. The synthetic ones, which are a mix of nylon and polyester, do wonders in holding the paint well. However, if you are going for oil-based finishes, it’s best to go for natural bristles.
Apply masking tape on the areas where you don’t want the paint to be prone to accidents. This can make your process a lot better.
To properly clean the surfaces of your furniture before painting, try using special cleaning agents like bleaching, soda, and ammonia to do the trick for you.
A mistake that many beginners make is to only focus on coats, not the texture. This can lead to uneven thickness on larger furniture. Therefore, try to align your strokes with each other. You can also avoid making fat edges where the paint’s gloppy cornices form a thick layer on the edges. Finally, make sure your brush is not overloaded and properly cover the edges for an ideal finish.
The biggest challenge is to create long, straight strokes. To help you do that, breathe out and hold your breath while making a long stroke. Later, you can vibrate your hands a little to cover the uneven and tiny corners.
Frequently Asked Questions FAQ
Is it necessary to sand furniture before using chalk paint?
No, it is not necessary to sand the furniture before you use chalk paint. However, since it will give you a matte finish, you will get to see each of the flaws accentuating and peeking behind the paint. Therefore, it’s best to clean the surface with cleaning agents before you begin the painting process. Other than that, if you are going over a high-gloss surface, a little bit of sanding can help you get that matte finish.
Does chalk paint scratch easily?
If you haven’t sealed your chalk paint properly, you run the chances of scratching it easily. Therefore, the best way to protect your paint and increase its durability is to apply a liquid topcoat once your paint has been completely dried.
Are you supposed to seal chalk paint?
In a nutshell, no protection means your masterpiece is vulnerable to any wear and tear that it may face. If you don’t like the finish of gloss topcoats, go for matte ones to give the desired look to your chalk paint.
What are the benefits I can get by using chalk paint on furniture?
Chalk paint is mainly famous for its rust, vintage, and chic look to give a farmhouse effect to your furniture. However, many people use their artistic flair to give a distressed look and add character to any boring corner of a house. The best part, it takes only a few hours to get your furniture looking Instagram-ready!
What’s trending in painted furniture?
A trend taking over on all celebrity homes and Pinterest profiles uses the flawless matte finish in paint colors like gold, copper, black, or silver metallic paints. You can also add a splash of bold colors to your stressed furniture to get a vintage look.
What is known as the best topcoat for chalk paint?
A high-performance topcoat in a flat finish is ideal for preserving your paint’s look, feel, and color. There is no doubt that topcoats are the key to improving the longevity of your chalk paint. However, if you prefer a rather gloss finish, you can go for a thick glaze to create shine and give a contemporary look.
Conclusion
Coming to the end of the guide, as easy as it may look when applying chalk paint, there are many things that you need to try yourself to see the best results. It is always recommended to use a paint sprayer for thin paints and as for thicker ones, it is best to count on brush paints. It also helps to give a creative layered and rugged feel to help create the vintage look that you’ve been aiming for.
Apart from the tips, chalk paints inevitably breathe life into any worn-out piece of furniture. The visual effects of these chalks allow you to go all in and go the extra mile to bring the best of your imagination. With a glowing house in bold colors and creative designs, it will surely be the hot topic of every gathering!
Most asked questions before selecting the color of wall paint with brown tiles floor, what color paint goes with brown tiles?
Our expert team found the best color combination for brown tiles. In our experts’ and other interior designer’s eye, the 11 best color combinations for brown tiles are:
Slate Gray
Cream
Sage Green
Navy Blue
Terracotta
White
Red
Blue
Purple
Brown
Sandy Beige
When it comes to interior design, finding the perfect color combination can transform a space from ordinary to extraordinary. One common dilemma many homeowners face is deciding what color paint goes with their existing brown tiles. The rich and earthy tones of brown tiles offer a versatile canvas for creating various moods and styles within a room. Whether aiming for a cozy and inviting ambiance or a modern and sophisticated look, choosing the right paint color can make all the difference in seamlessly tying together your decor scheme. In this article, we will explore expert tips and creative ideas to help you discover the perfect hues that flawlessly complement your brown tiles.
The room purpose (Is it a living room, a kitchen, or a bathroom)
The area covered by the tiles in the room
The overall color scheme of your house
The effect you want to give to the aesthetics of your room, and so on.
Let’s have a look at different color combinations with brown tiles:
Different Wall Paint ColorThat Goes With Brown Tiles
Normally, brown is a neutral color that can be complemented with various other shades of warmer or coolest-toned colors. Each combo creates different results that give a range of different looks to your room. But, the most preferred is to use brown tiles color with different hues of neutral shades like grey and white to give a more intense look to your room.
Brown Tiles With Slate Gray Wall Paint
In the realm of home decor, the combination of brown tiles with slate gray wall paint has emerged as a timeless and sophisticated pairing that exudes both warmth and modernity. This unexpected yet harmonious blend creates a rich tapestry of textures and tones that elevates any room from mundane to magnificent.
Brown Tiles With Slate Gray Wall Paint
Brown Tiles With Cream Wall Paint
One classic yet often overlooked combination that exudes warmth and sophistication is the pairing of brown tiles with cream wall paint. This timeless duo brings together earthy richness and subtle elegance, transforming any room into a sanctuary of comfort and style. Imagine stepping into a bathroom adorned with lustrous brown tiles that evoke images of natural wood grains, complemented by walls painted in a creamy hue reminiscent of soft vanilla ice cream. The interplay between these warm tones creates a harmonious balance, infusing the space with a sense of serenity and refinement. Whether used in kitchens, bathrooms, or living areas, this color scheme offers versatility and charm that can suit various design styles
Brown Tiles With Cream Wall Paint
Brown Tiles With Sage Green Wall Paint
The combination of brown tiles with sage green wall paint creates a harmonious and sophisticated aesthetic. The earthy tones of the brown tiles add warmth and depth to the space, while the soft hue of sage green on the walls brings a sense of tranquility and freshness. This pairing exudes a natural and organic vibe that can make any room feel inviting and relaxing. Moreover, the contrast between the rich brown tiles and the muted sage-green walls adds visual interest and dimension to the space. This combination is versatile enough to complement various design styles, from modern to rustic. By incorporating elements of nature into your home decor with brown tiles and sage green paint, you can create a soothing environment that promotes feelings of peace and serenity.
Brown Tiles With Sage Green Wall Paint
Brown Tiles With Navy Blue Wall Paint
One of the most sophisticated color combinations in interior design is the pairing of brown tiles with navy blue wall paint. The deep richness of navy blue adds a sense of calm and depth to any space, while the warm hues of brown tiles bring a subtle earthy charm that complements the overall aesthetic. This combination creates a harmonious balance between cool and warm tones, making it versatile for various design styles.
Brown tiles with navy blue wall paint can be used in both traditional and modern spaces, adding a touch of elegance and sophistication. The dark tones create a cozy atmosphere perfect for creating a relaxing retreat in bathrooms or bedrooms. To elevate this color duo further, consider incorporating metallic accents like gold or brass fixtures to add a touch of luxury and glamour. This classic yet contemporary combination is sure to stand the test of time, making it an excellent choice for those looking to create a stylish and inviting space.
Brown Tiles With Navy Blue Wall Paint
Brown Tiles With Terracotta Wall Paint
Combining brown tiles with terracotta wall paint can create a warm and inviting atmosphere in any space. The earthy tones of the terracotta complement the richness of the brown tiles, adding depth and character to the room. This color scheme works particularly well in bathrooms and kitchens, where a cozy and rustic feel is desired.
One key advantage of using brown tiles with terracotta wall paint is that it adds a touch of warmth without being overpowering. The combination evokes a sense of natural beauty and simplicity, creating a harmonious environment that is both stylish and timeless. By carefully selecting complementary accents such as wooden furniture or metallic fixtures, you can elevate the overall aesthetic appeal of the space while maintaining a cohesive look that exudes sophistication.
Brown Tiles With Terracotta Wall Paint
Brown Tiles With White Wall Paint
The juxtaposition of brown tiles with white wall paint creates a stunning contrast that exudes elegance and sophistication. The warm earthy tones of the brown tiles complement the crisp, clean look of the white walls, creating a harmonious balance in any space. This combination is a timeless choice that adds depth and dimension to the room while maintaining a sense of simplicity and serenity.
The brown tiles add a sense of warmth and richness to the overall aesthetic, while the white walls provide a bright, airy backdrop that helps to visually expand the room. This pairing is versatile and can be adapted to suit various design styles from modern to traditional, making it a popular choice for both residential and commercial spaces. Ultimately, the combination of brown tiles with white wall paint enhances the visual appeal of any room, creating an inviting atmosphere that is both sophisticated and welcoming.
Brown Tiles With White Wall Paint
Brown Tiles with Red Wall Paint
The harmonious combination of brown tiles with red wall paint can create a stunning and sophisticated look. The rich earthy tones of the brown tiles complement the boldness of the red walls, adding warmth and depth to any space. This pairing works particularly well in areas like the kitchen or bathroom, where the contrast between the two colors can create a dramatic yet inviting ambiance.
The key to successfully incorporating brown tiles with red wall paint is to balance them properly. Opt for lighter shades of brown tiles to prevent overpowering the deep intensity of the red walls. Consider adding accents like metallic fixtures or light-colored furnishings to enhance the overall aesthetic appeal. By carefully selecting complementary elements, this combination can transform any room into a stylish and contemporary haven that exudes sophistication and charm.
The pairing of brown tiles with blue wall paint creates a striking visual contrast that adds depth and sophistication to any room. This combination can evoke a sense of tranquility and relaxation, making it an ideal choice for bathrooms or bedrooms where creating a soothing atmosphere is key. The richness of the brown tiles enhances the depth of the blue wall paint, creating a dynamic interplay that draws the eye and lends a sense of luxury to the space.
Overall, combining brown tiles with blue wall paint allows for endless design possibilities, from achieving a rustic chic look to creating a contemporary style with an edge. Whether used in large or small spaces, this pairing is sure to elevate any room’s aesthetic appeal while offering a timeless and elegant ambiance.
Brown Tiles with Blue Wall Paint
Brown tiles with Green Wall Paint
The combination of brown tiles with green wall paint creates a harmonious and welcoming ambiance in any space. The earthy tones of the brown tiles complement the freshness of the green wall paint, bringing a sense of balance and tranquility to the room. This combination is particularly effective in creating a natural and organic feel, making it ideal for spaces such as bathrooms or kitchens where a connection to nature is desired.
In addition to their aesthetic appeal, brown tiles paired with green wall paint can evoke a sense of sophistication and elegance. The richness of the brown tiles adds depth and warmth to the room, while the green walls provide a pop of color that enlivens the space. This pairing can also create a calming atmosphere, making it perfect for creating cozy and inviting living areas or bedrooms. Overall, combining brown tiles with green wall paint allows for endless possibilities in interior design, offering a unique and stylish look that is both timeless and versatile.
Brown tiles with Green Wall Paint
Brown Tiles with Purple Wall Paint
The combination of brown tiles flooring with purple wall paint creates a captivating visual contrast that exudes warmth and sophistication. The earthy tones of the brown tiles ground the space, offering a sense of stability and elegance, while the vibrant hues of purple on the walls add a touch of luxury and personality. The interplay between these colors brings depth and richness to the room, making it both inviting and stylish. Whether in a cozy living room or a chic bedroom, this pairing creates a striking ambiance that leaves a lasting impression.
Brown Tiles with Purple Wall Paint
Brown tiles with Brown Wall Paint
A matching look can never be out of trend in makeup dressing fashion or fashion interior design. The past year of 2020 was a year of monochromatic looks in the fashion industry, makeup industry, and interior designing industry. The brown wall paints like latte, mocha, and chocolate colors with brown tiles give a bright sophisticated look to the area. Add a variant to the brown matching wall by opting for the textured or glossy effect of the wall so that the wall can stand with brown tiles like glossy stripes or a sponging effect on the wall.
Brown tiles with Brown Wall Paint
Brown tiles with a sandy beige wall
Brown tiles with a sandy beige wall are a great combination for creating a natural and earthy feel in your home. Brown tiles are perfect for floors and walls in any room where you want to create a warm and welcoming atmosphere. The sandy beige color of the walls helps to add a touch of elegance to the room, while still keeping it feeling grounded and natural. This is a great choice for those who want to create a space that feels both cozy and chic.
Brown tiles with a sandy beige wall
Final Words
In conclusion, choosing the right color paint to complement brown tiles can greatly enhance the overall aesthetic of a room. The 11 best ideas presented in this article offer a variety of options to suit different styles and preferences. Whether opting for a contrasting color scheme to make the tiles stand out or selecting a complementary shade to create a cohesive look, there are plenty of choices available. By considering factors such as lighting, furniture, and personal taste, homeowners can find the perfect paint color to harmonize with their brown tiles. Take inspiration from these ideas and experiment with different combinations to transform your space into a beautifully coordinated and inviting environment.
Are you planning to renovate your kitchen and give it a whole new look? Then you must be on the lookout for the best paint for kitchen cabinets as cabinets are the essence of any kitchen – modern or traditional.
Finding the right paint can sometimes be a bit tricky, especially when there are quite a number of options to choose from. You might be in need of a paint that is durable, shiny, and available in many colors, but what other factors must you consider?
The kitchen cabinet experts tell us that the best paint for kitchen cabinets is one that offers a semi-gloss or satin finish. Moreover, it should be able to reflect light and should also be washable.
It is also recommended to use acrylic paint instead of vinyl for painting kitchen cabinets. This is because acrylic latex-based paint is not only washable but it also quite durable and long-lasting. So, there you go.
If you are ready to discover some of the top-rated paints available on the market in this category, keep reading on. In this article, you will learn why it is important to paint your cupboards, and what types of paints are available to choose from.
So, let’s get started.
What do You need to Know Before Painting Cabinets?
Kitchen cabinets come in many different materials. It is usually easy and straightforward to paint wooden and metallic cabinets without having to worry about the results. However, plastic laminate cabinets may not be that simple to paint.
If you have plastic laminate cabinets, it is recommended that you took the advice of a professional paint dealer. This is because different paints have different results on these types of cabinets. So, it would be better to first test a sample of the paint and then decide depending on its result.
Let’s look at some of the pre-requisites of painting kitchen cabinets.
1. Clean and Prep the Cabinets
It’s not possible to just start painting your cabinets as it is. Your existing cabinets must be in a good condition overall to respond properly to any kind of paint you plan on using. So, first of all, check the existing paint and see if it needs to be brushed off using an abrasive pad. And finally, use a vacuum cleaner to eliminate dust particles completely.
2. Choose the Right Paint
There is a huge variety of paints available on the market. From acrylic milk paint and enamel-based paint to chalk and velvet finishes, the choices are quite diverse. To choose the right paint, you need to take into account the material your cabinets are made of, and the finish you have in mind.
Choose acrylic over vinyl and make sure you follow the instructions on the can regarding cure time especially when it comes to using latex paints. We have a complete section on how to choose the right paint for your cabinets because this requires further elaboration, so keep reading on.
3. Keep Your Expectations Realistic
Before you choose to paint or start painting your kitchen cabinets, it is highly recommended that you check the condition of your cabinets. If they are outrageously damaged or chipped, applying paint on them is not going to do any good.
Also, keep in mind that it’s not going to be a one-day job or something you can achieve quickly or without any hassle. Keep your expectations realistic so the results would match with them and not with the images you drool over every day on Pinterest and Instagram.
4. Use a Primer
Make sure you use a primer before applying paint to your kitchen cabinets. Not only will it cover the imperfections but will also provide a suitable surface to accept the paint more readily and make it stick. Once the primer dries off, you can sand the surfaces that are flat.
A primer particularly offers a good base for water-based paint with a semi-gloss finish. Never go for a cheap or low-quality primer-sealer just to save money because this is an important step and you cannot expect to have perfectly painted cabinets without priming them first.
5. Set Up a Temporary Kitchen
And last but not least, you need to have a makeshift kitchen ready for use when you start painting your kitchen cabinets. This is because the process might take longer than you expect, particularly if you’re doing it for the first time. And therefore, you need an adjacent room to use as a temporary kitchen till you’re done.
Different Types of Kitchen Cupboard Paints
We thought this topic requires a complete section so here it is. Choosing the most suitable paint for your cabinets is important to achieve the desired results. So, here are a few suggestions including tips and tricks to make the job easier for you.
Alkyd Enamel Paint
The kitchen cabinet experts recommend using Alkyd enamel paint, which is water-based and offers all the benefits of an oil-based paint with extra features and durability. But it is advisable to use a primer first if you plan on using this type of paint. If you have unfinished wooden cabinets, use a primer-sealer that blocks wood tannins.
When using Alkyd paint, there is no need for a topcoat. Moreover, it is easy to clean with any type of solvent or cleaner since it is water-based. All major brands nowadays offer alkyd enamel paint for kitchen cabinets including Behr, Valspar, and Benjamin Moore.
Out of these, Sherwin Williams ProClassic is the most expensive and Behr is the least expensive paint. You can choose any one of these brands depending on your budget as they all have been tried and tested and offer great results.
General Finishes Milk Paint
Another expert suggestion for painting kitchen cabinets is General Finishes Milk Paint. It is recommended to lightly scuff the cabinets using 220 grit sandpaper if you plan on using this type of paint. While many people would not recommend sanding, professionals always advise it.
You don’t need to apply a primer though and that’s probably the biggest advantage of General Finishes. But unlike Alkyd paint, you would need to apply a topcoat to achieve the desired level of sheen ranging from extra flat to high gloss.
GF milk paints take about 2 to 3 weeks to cure completely. This type of paint is recommended if you are aiming for more depth in color and a low luster finish. It is commonly used by designers who want to lend a vintage or “worn out” look to their furniture.
Chalk Paint
Chalk Paint is best for wooden kitchen cabinets and is recommended if you want to give your kitchen a refresh at the minimum possible cost. It is advisable to use a flat brush for applying chalk paint over your cabinet doors and drawers. Before painting a second coat, let the first coat dry.
When you’re done painting all the cabinets, let the paint dry, and then wax the doors using Clear Chalk Paint Wax. If you leave it overnight and then buff it with a cotton cloth the other day, it gives a perfect polished finish.
Chalk Paint holds up really well with absolutely no chipping even after months. And the best thing is, that you don’t need to prep your cabinets before applying this type of paint. So, it’s perfect for small DIY projects or renovations you want to achieve without seeking professional help.
Painting cabinets can be a messy job especially if you are painting them for the first time. There will be backsplash and drips to clean after the job is done. So, you need to know how to carry out this DIY project safely and properly.
You can use rosin paper to cover and protect the countertops and the floor. It is inexpensive and quite useful.
It is recommended to remove cabinet doors and drawer fronts before painting them. This way you will get a much neater result and avoid slopping the interior of the cabinets and drawers with paint.
Before you start the job, label each cabinet door and make a rough sketch on paper to understand where each part will go once the job is done.
If your cabinets are old and greasy, de-grease them first using phosphate-free cleaner. Some people also use simple and handy dishwashing liquid for this step but getting a professional solution is better if you want the best results.
The next step is to sand the cabinets. This step is required to make sure the paint will easily grip to the surface. If there are bumps and other imperfections on your cabinets, it is recommended to use coarser 100-grit sandpaper. Otherwise, 120-grit sandpaper used for light sanding should be adequate.
Remove the sanding dust completely before you start applying the paint. Use a vacuum cleaner for this job and afterwards use a tack cloth to pick up remaining particles of dust.
If the paint you have chosen requires a primer, choose a fast-drying product. Oil-based enamel primer is the recommended choice for optimal results. It not only levels well but also sands easily.
If your wooden cabinets come with holes and dents, use wood filler to fill them up before applying the first coat. You can use a flashlight to illuminate imperfections that are less noticeable. Use filler that sticks well and re-prime the areas you have just repaired.
Many painting experts advise sanding lightly between coats to remove dust that settles in while the paint is drying. You can use 220-grit sandpaper for this step. Again, use a vacuum cleaner and a tack cloth afterward to remove all dust particles before applying the next coat of paint.
Top 8 Best Paint for Kitchen Cabinets
Here is our review of the top 8 best paint for kitchen cabinets based on customer feedback and their suitability for painting different types of kitchen cabinets.
1. INSL-X Cabinet Coat Semi-Gloss Paint – Best for Beginners
This paint is perfect if you don’t have any prior experience in painting your cabinets. It doesn’t require much effort on part of the painter and still gives the desired results. Its ultra-smooth finish is great for kitchen and bathroom cabinets.
It is recommended to use an angled sash brush to apply this paint. It may require multiple coats to reach the desired consistency and you will have to wait for about 6 hours before applying a second coat. Moreover, it may not wipe off as easily as other paints do. So, be prepared for this kind of extra work.
Some people may find the paint a bit pricey but since it’s great for beginners the price shouldn’t be a concern. If you don’t prep the cabinet before using it, it may chip easily. Always follow the instructions on the label to achieve the best possible results.
Features
Urethane-acrylic cabinet paint
Ultra-smooth finish
Meant for interior use only
Water-based paint
6 hours of drying time
Easy to work with and great for beginners
What We Like
No priming is required if the surface is spick and span
Easy to clean and wash
No streaking
What We Don’t Like
Sanding required in between coats
Not meant for exterior use
A little more expensive than other products
2. Rust-Oleum Multi-Purpose Enamel Paint – Best for Quick Drying
Rust-Oleum is a brand trusted by most homeowners and professional painters. The company offers a wide range of acrylic paints for interior and exterior items. This particular water-based enamel paint by Rust-Oleum provides a semi-gloss finish and resists chipping.
It is also a recommended choice for concealing imperfections in your cabinets. However, before using this paint, you need to sand the surface using either 180 or 200 grit sandpaper. This may increase the overall time required to complete your project but the quick-drying feature of this paint compensates for that time.
It is advisable to use a base primer before applying this paint. Also, if you try to paint two thick coats instead of multiple thin layers, the result might differ from what you expect. So, it’s a good idea to go through the instructions on the can before using this paint.
Features
Semi-gloss smooth finish
Water-based latex paint
Easy to apply
Good for different surfaces including wood, metal, and ceramic
Requires two bonding coats and a topcoat
What We Like
Dries in half an hour
Easy to clean and wash
Available in a number of attractive colors
What We Don’t Like
Without using a primer, the paint doesn’t provide desired results
Extremely drippy
It may harden your paintbrush
3. Giani Granite Nuvo Cabinet Makeover Kit – Best for Fast Results
This makeover kit has received great reviews from customers as it does not require a lot of time and it is also quite easy to use. Nuvo cabinet paint has been formulated to be self-leveling, which means the brush strokes will not be visible after you are done. The result is an extremely smooth and satin finish, which is perfect for kitchen cabinets.
To paint dark cabinets white, you will have to sand them using 300 to 330 sandpaper first and then use multiple coats for full coverage. You will be able to start using your kitchen again after a few hours of application and that is why it is best for fast results.
There is no need to remove the cabinets to paint them using this product. This kit can be compared to the famous Rust-Oleum makeover kit in terms of features and price. Both are DIY-friendly but Nuvo is even better suited to beginners because it is self-leveling. If you want a more professional finished result, then go for Rust-Oleum.
Features
Acrylic water-based paint with primer
Satin finish
Low odor and free from VOCs
A single coat takes about two hours to dry completely
Ideal for wooden, laminate, vinyl, and metal cabinets
Available in a number of beautiful colors
What We Like
It comes with a primer in it
Can be used on multiple surfaces including thermofoil
Offers a 24-hour cabinet makeover system
The finish is durable and requires no protective topcoat
What We Don’t Like
The rollers that come with the kit are not very efficient
It is a bit pricey for DIY projects
4. INSL-X Cabinet Satin Sheen Paint Set – Best for Professional Look
If you are looking for a complete cabinet painting kit that will offer factory-like results, choose this paint. All that is required is to clean and dry the surface completely before applying this paint. It doesn’t require a primer and is therefore easy to use.
However, if you want to hide stains and marks, use a primer for best results. You can use a primer from the same supplier. The paint can be applied with a sprayer and there is no need to thin it down. However, keep in mind that you may need up to four coats to reach your desired level of color and texture.
The instructions recommend light coating but you can also use heavy coating depending on your requirements. The paint is self-leveling and does not leave brush strokes. The recommended recoat time is six hours.
Features
Urethane-acrylic paint formula
Ultra-smooth durable finish
Does not require a primer
Works well on previously painted cabinets
Good for multiple surfaces
What We Like
Resists chipping and staining
Is known to last for many years
No odor
Easy to work with
What We Don’t Like
It May require up to 3 gallons to paint the entire kitchen due to the thin consistency
May cause streaking in some areas
5. Rust-Oleum Protective Satin Enamel – Best for Durability
Although formulated for outdoor furniture, this paint works well on all types of surfaces including wood, concrete, and metal. It’s an oil-based formula, unlike the other paints we have discussed in this review. It offers a protective top layer to protect the cabinet against abrasion, fading and chipping.
The paint can be thinned out using a paint thinner especially if you want to use a sprayer. However, thinning is not required if you plan on using a brush or roller. The paint is self-leveling and smooths out on its own. So, it’s good for beginners.
The result of this paint is very different from what you get with water-based latex paint. The colors are rich and the finish is absolutely beautiful and ultra-smooth to the touch. It can be used to paint just about any surface including ceramic in the bathroom, outdoor metal furniture, or wooden cabinets and drawers.
Features
Available in nature-inspired colors
Low-sheen satin finish
Oil-based paint formula
Good for indoor/outdoor use
Offers excellent resistance against rust and chipping
What We Like
Quick drying
Does not fade easily
Durable and protective against chipping and cracking
UV resistant
What We Don’t Like
Strong and unpleasant odor
Some people may find it thick and not easy to work with
6. Rust-Oleum Transformations Cabinet Refreshing Kit – Best for Complete Renovation on a Budget
The best thing about this painting kit is that you don’t need to sand or prime your cabinets. However, some people have mentioned that if you use a primer before applying this paint, you may not need three or more coats to achieve the desired results. So, it’s your own decision if you want to use a primer or not.
Once you’re done painting your cabinets, they would have completely transformed. The system offers a multi-layered protected surface that will last for many years to come. It comes with a deglosser so you don’t have to spend hours prepping and sanding the cabinets.
It also offers a glaze paint in the kit, which is optional to use. After two bonding coats, you may use a third glaze layer and then finally a protective topcoat. A lot of people have found the results to be extraordinary and very pleasing.
Features
Perfect for laminate cabinetry
Durable and professional results
Acrylic water-based paint
Easy to clean with water and soap
May work well without priming
What We Like
No sanding or stripping required
Absolutely no odor
Great for DIY projects on a budget
One kit is sufficient for a small kitchen
What We Don’t Like
It May require multiple coats for full coverage
You have to buy the complete kit even if you don’t need the glaze paint
7. General Finishes Water-Based Milk Paint – Best for Inexpensive Makeover
This paint is highly recommended for cabinet refinishing and therefore we added this to our list of best paints for kitchen cabinets. It is known to cover really well so even if you have old and highly stained cabinets, you can safely use this paint to give them a completely new look.
A gallon of this paint would be enough to paint a kitchen, which is average in size. The paint is thick in nature and therefore only a couple of coats would be enough to reach your desired color. Nevertheless, keep in mind that it won’t be possible to use a sprayer because it wouldn’t thin down.
If you want to use a protective or semi-gloss topcoat, choose General Finishes semi-gloss top layer paint. It will give the flat finish a glossy look, which is recommended for kitchen cabinets.
Features
Water-based milk formula
Flat finish
Simple and easy to apply
High quality and high coverage paint
Quick drying
What We Like
Can be applied with a roller, brush, or sprayer
Extremely durable
Easy to clean
Does not leave brush marks
What We Don’t Like
A topcoat may cause yellowing when you’re using white color due to a reaction with the substrate
May chip without a topcoat
8. Rust-Oleum Milk Paint Finish – Best for Matte Finish
If you want to give your cabinets a unique brushed effect with a matte finish, choose this paint. It is perfect for achieving that antique look some people desire in their décor. It is a pre-mixed formula and therefore there is no need to use a primer before application.
The result is a semi-transparent look, which gives a modern touch to your cabinets. You can mix multiple colors and apply a number of coats to create your own custom texture. Some people choose to lightly sand it after application for a distressed and antique appearance.
It is recommended to wait half an hour before applying a second coat. The paint is available in a number of beautiful colors including navy, highland blue, and Venetian yellow. Since it doesn’t need priming, it is easy to work with. If you want to make the result look a bit glossy, you can use a clear gloss over it.
Features
Beautiful modern matte finish
Non-toxic and safe to use
Water-based milk paint formula
Lightly textured in nature
Can be layered for a different customized look
What We Like
Dries in about half an hour
Good for new and old cabinets alike
No need for a primer
Low odor formula
What We Don’t Like
You May need several coats to reach your desired color
May scratch and chip easily
How to Choose the Right Paint For Cabinets?
Now, this is the tricky part. With so many options available on the market and mixed reviews on each of those products, it sometimes gets difficult to decide which one is best suited to your needs.
Here is a step-by-step guide to choosing the best paint for kitchen cabinets.
Step 1 – Consider your budget
There are many types of paints available on the market and to choose the best paint for kitchen cabinets, you have to consider your budget first. Instead of buying two or three gallons together, first, buy a quart and do a patch test to see if it’s the right color and the right finish.
Sometimes painting kits are more cost-effective than buying individual supplies. This is because these kits are designed to get the job done quickly and are often quite reasonably priced.
Step 2 – Read the label
This is an important step because you need paint that has been specially formulated for woodwork and cabinetry. Moreover, check the finish the paint offers and choose semi-gloss or a satin sheen because it is easy to achieve even for beginners.
If you choose a highly glossy finish, you might need to prep and sand your cabinets very precisely; otherwise, the desired results will not be achieved.
Step 3 – Make sure it’s easy to work with
Paints that are too thick and require thinners in order to be able to level out on their own are not easy to work with. If you haven’t painted cabinets in the past, make sure you buy paint that already contains all the substances needed and is easy to work with.
Step 4 – When in doubt, go for acrylic urethane
Many people out there might not have any idea about the type of paint to use for their cabinets. So, when you are unsure, simply go for acrylic urethane because it sticks quite well to almost any type of material. You can also opt for acrylic urethane as a primer and any other paint for topcoats.
Step 5 – Read user reviews
This might sound obvious but some people tend to ignore the negative reviews a product has received. If more people are dissatisfied with a particular paint or brand, try to find a substitute in the same category.
Final Thought
Updating kitchen cabinets can tremendously enrich your old and boring kitchen. However, not everyone can afford to replace their cabinets entirely. The best way to spruce up your kitchen on a budget is to update your kitchen cabinets with fresh paint. Remember, any surface that can be scraped with sandpaper is good for painting.
However, it’s important to find the best paint for kitchen cabinets depending on their overall condition, the material they are made of, and the final result you are looking for. Always choose high-quality paint because it’s a job that requires special skills and a lot of effort and you definitely wouldn’t want all that to go wasted.
Use this article as a guide to help you choose the right paint for your cupboards and get yourself ready for the job!
Let’s suppose you are making your home and you have a large amount of concrete as it is affordable and most uses equipment in house making if your fresh paint falls on your concrete. It is very easy to remove the fresh paint from concrete; you must cover the surface with water and use the detergent or hand scrub brush. After that, you can see the efficient results. But now another case when the paint becomes dry on the surface, what do we have to do now?
Now the paint can’t be removed by just detergent. Also, we can say it is impossible as the paint had gone through several layers of concrete. We have to use muriatic acid for this process. Can Muriatic acid remove your paint from the concrete? Yes, it’s the best method, but it’s time-consuming, and you have to follow all steps. Firstly and the most important is to know how to use muriatic acid for removing paint. If you don’t know the proper usage of muriatic acid, you must follow all the instructions. It’ll prove very helpful in the removal of your paint. But if you don’t follow all the instructions, then it’ll cause serious results. That is not only harmful to your surface but also to you.
● Always dilute Muriatic acid in water. It depends upon how and where you’re using it, but generally, there is the 10th part of water and one part of only muriatic acid.
● Slowly and gently pour the acid into water and make the solution.
● Remember the sequence; the sequence is to put acid into water. Never make the mistake of pouring water into acid. If you do this, then a serious reaction will happen like an exothermic reaction. And the acid will fall from the bucket to you.
● Pour the muriatic acid always in the full container of water. Fill the container according to the amount of acid you want to use. Never pour the acid into an empty bucket.
● Another instruction never to forget is never to make a mixture of muriatic acid with another acid.
● Use only glass or plastic buckets that are acid-resistant for the mixture of muriatic acid.
● Store the muriatic acid in the container in which it brings.
When you want to remove paint from concrete by muriatic acid, it’s a challenging and time-consuming task for you. Here I’ll share how you have to do it. If you follow all these steps, then you’ll not face any difficulty.
As you know, concrete is very porous, that’s why it absorbs paint very speedily. It can absorb paint up to its many layers. When paint absorbs into deep layers, it’s a challenging task to remove paint from concrete. What do we have to do to remove paint from a very deep surface? We have to use a pure method that’ll not damage your concrete. Let’s discuss the method.
Supplies Needed
● Muriatic acid
● Bucket
● Water
● Broom
Only these four supplies help you in removing the paint from your concrete.
Method To Remove Paint From Concrete
Of course, it’s a difficult and complex task when you’re removing paint from concrete. Concrete is a rough structure where paint can easily be adhered to. Here we’ll use Muriatic acid, which is best for removing paints from concrete, but we have to use it with proper precautions; otherwise, it’ll cause serious results. It can damage your skin and clothes, so keep in mind wearing protective clothes, using gloves, and working in a well-ventilated area.
Step 1 : Making of mixture
The first step in removing the paint from the concrete is using one part of the muriatic acid and eight parts of water and then mixing it in a bucket and making a solution. You can use undiluted acid; it’ll help you in avoiding splashing.
Step 2 : Pouring of mixture
Now pour your mixture on the affected area(where there is paint)to remove stains. Remember to pour the mixture thoroughly in a gentle way.
Step 3 : Broom to clean
Pick up the broom and scrub the painted area to remove your paints or any stains from concrete.
Step 4 : Use clean water
Now, wash the surface with water in-depth to remove any acid from the surface. Clean water helps you to remove any particle of acid from the damaged area.
Step 5 : Strains and paint are removed.
Your affected area is now painted and stains-free. You’ll see the stain-free area from your concrete.
Step 6 : Repeat the process
If you’ll feel any pain or strain has remained on the surface, repeat the process as we discussed above.
Tip
You’ll face difficulty if there are several paint coats as it is hard to remove the multiple coats by acid. So, you can use the floor scrubber; it’ll help to sand your surface and remove your paint efficiently. Then you can use muriatic acid for proper cleansing.
Warning
While working with muriatic acid, you must wear heavy, acid-resistant gloves, and you should use a respirator also with it. It’ll help you to protect yourself from fumes.
We call Muriatic acid another hydrochloric acid (HCl). If it is not used properly, it’ll cause serious skin injuries to your eyes or skin. That’s why it is always instructed to wear eye protection things like goggles safety glasses. Don’t use normal eyeglasses as they cannot protect you from splashes. Also cover full clothes and rubber gloves. For muriatic acid, nitrile gloves are considered as best. The open shoes are not ok for this purpose. Wear full boots that cover your feet entirely.
If the acid falls onto your skin, clothes, or shoes during the process, wash thoroughly with large quantities of water. If after washing still you face any redness, then urgently go to your doctor and check to the
All these instructions will help you to remove paint by muriatic acid from concrete. But remember to follow all the instructions thoroughly. It is necessary for efficient results.
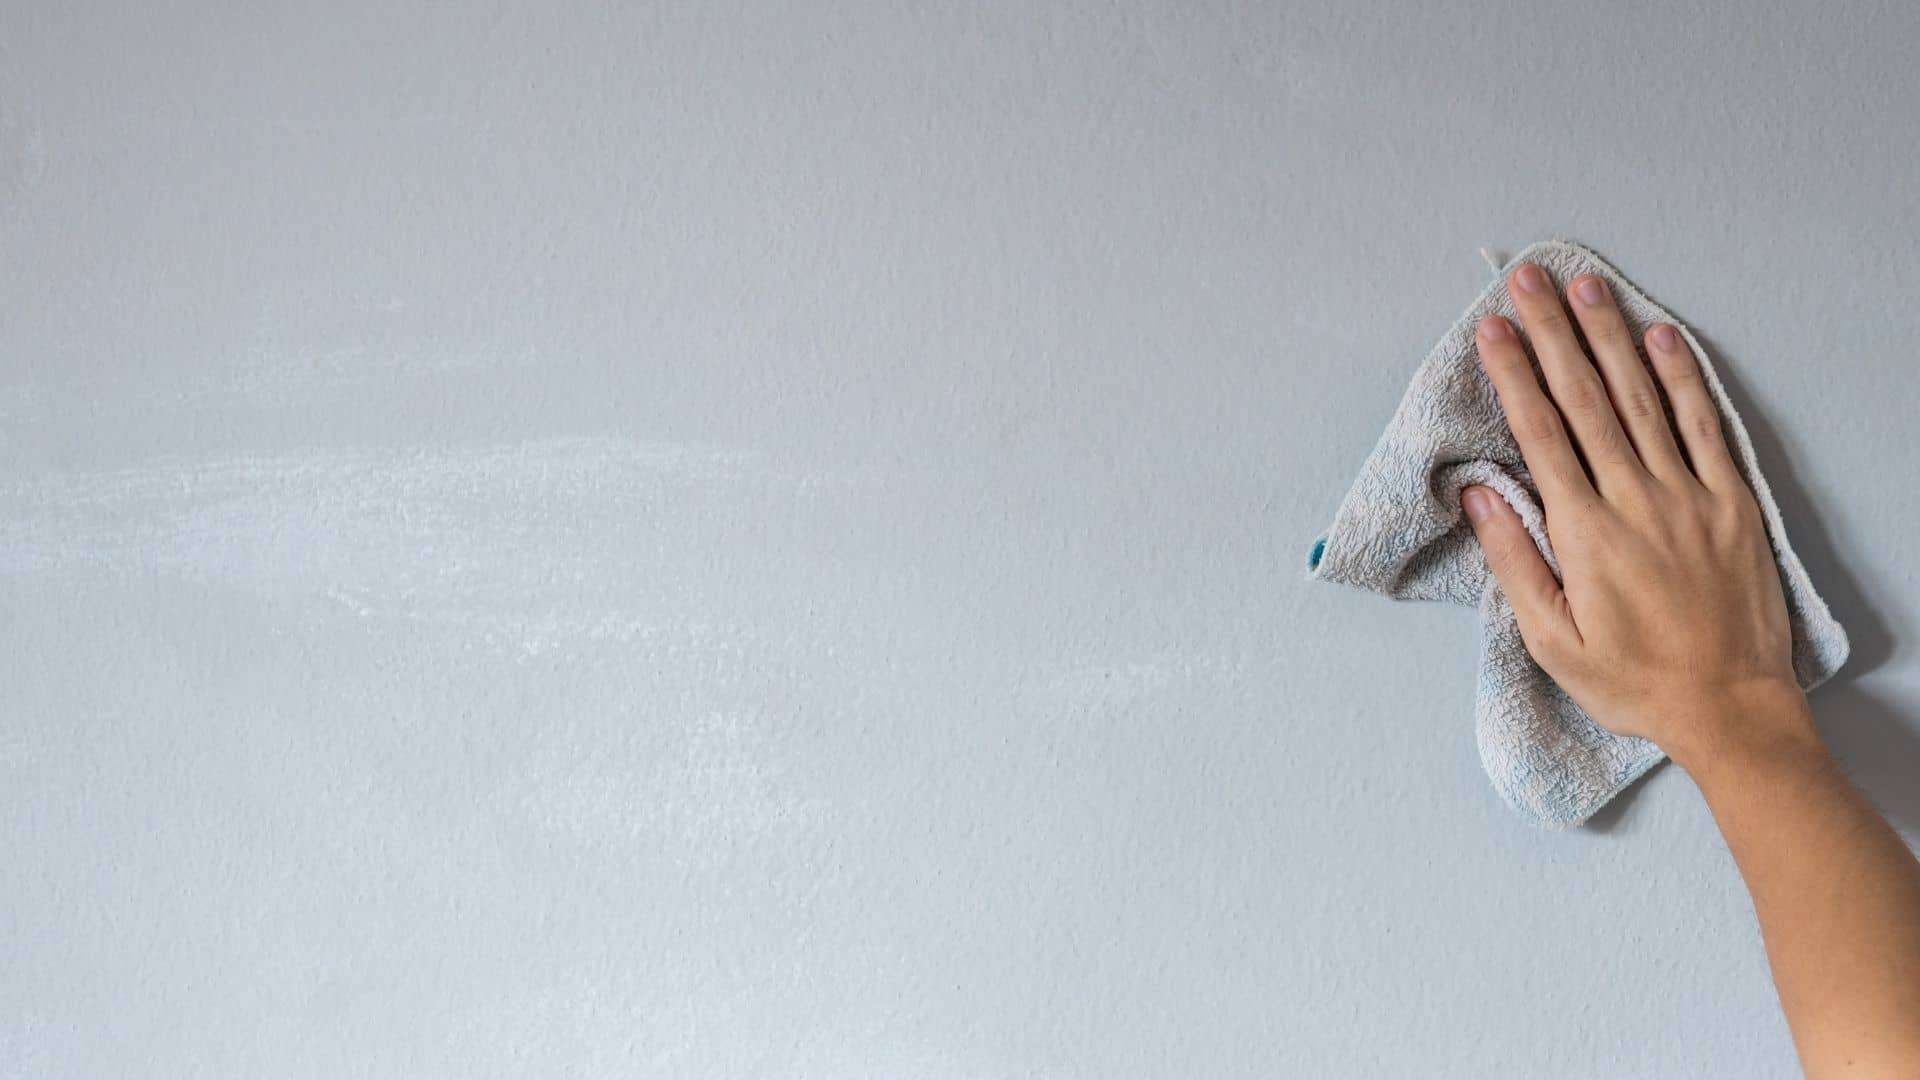
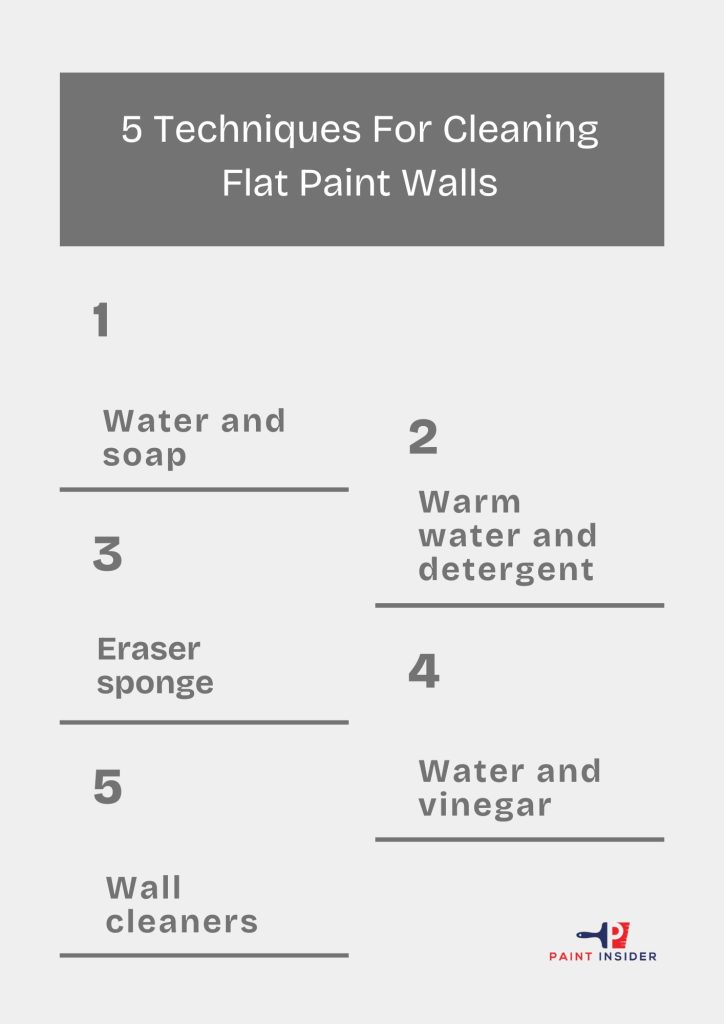
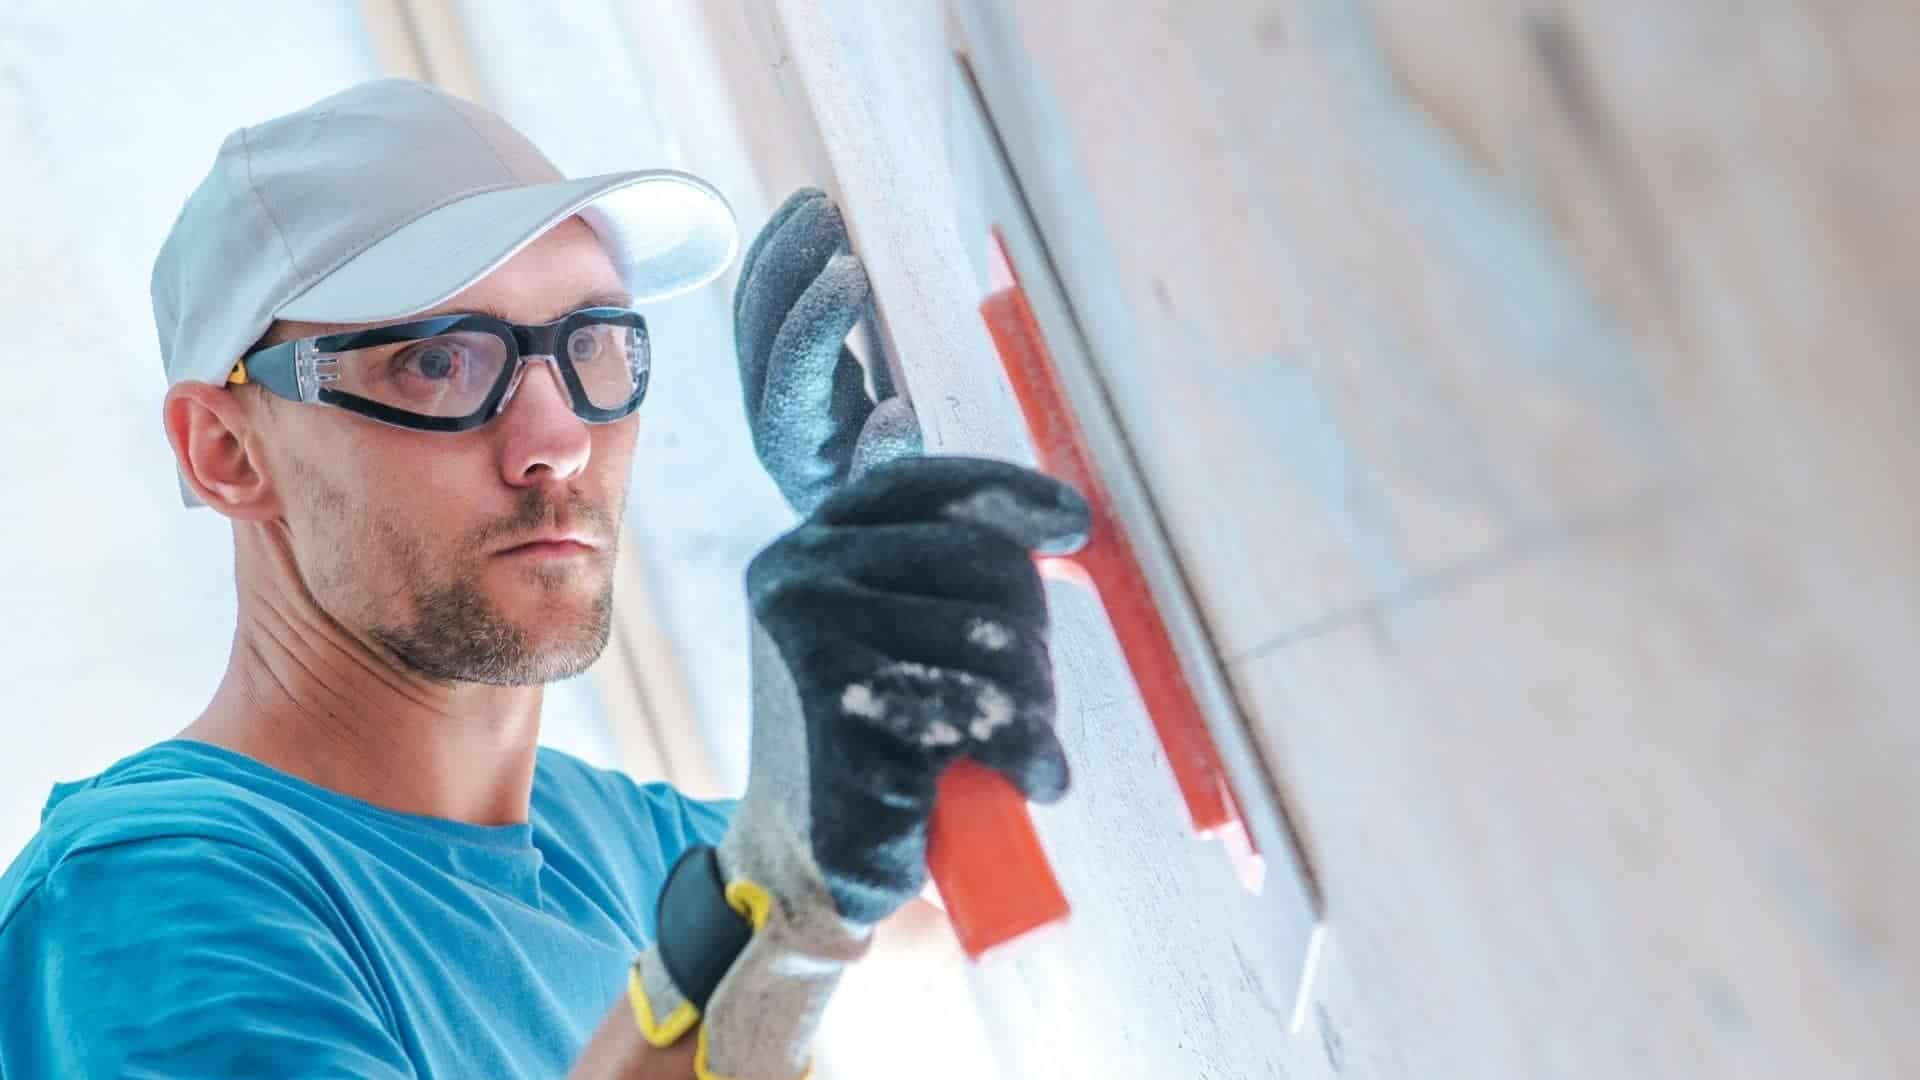
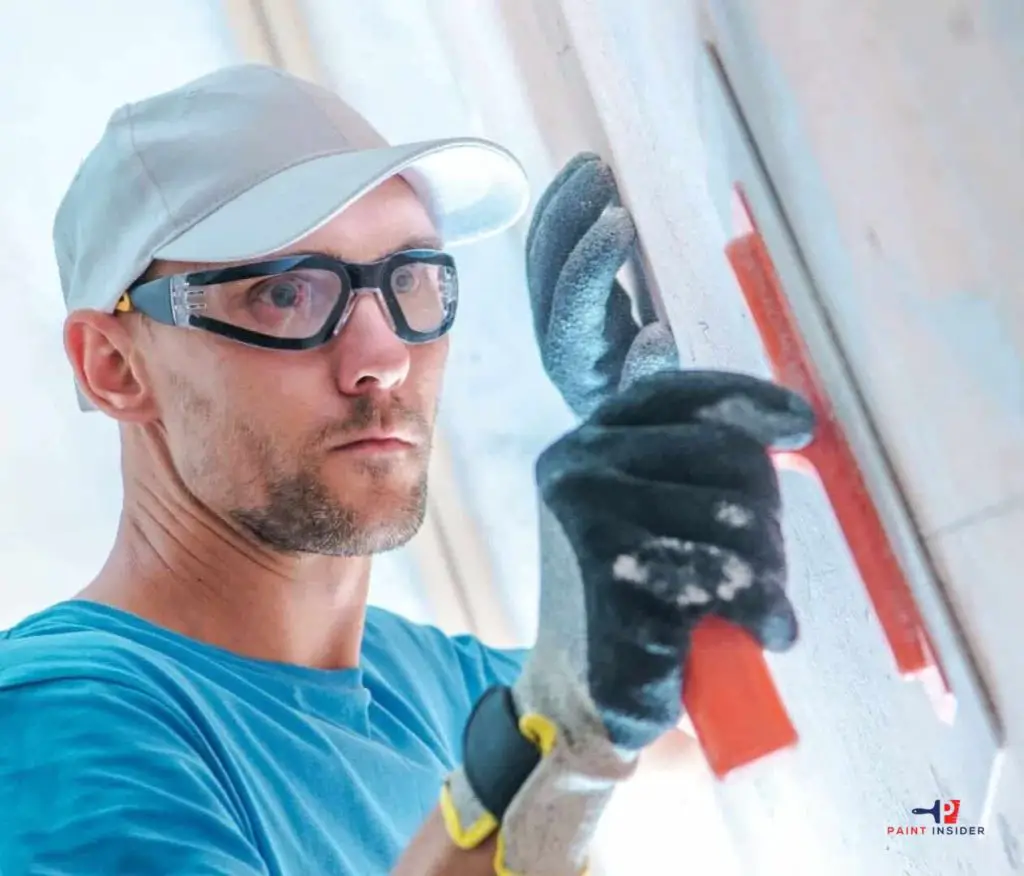

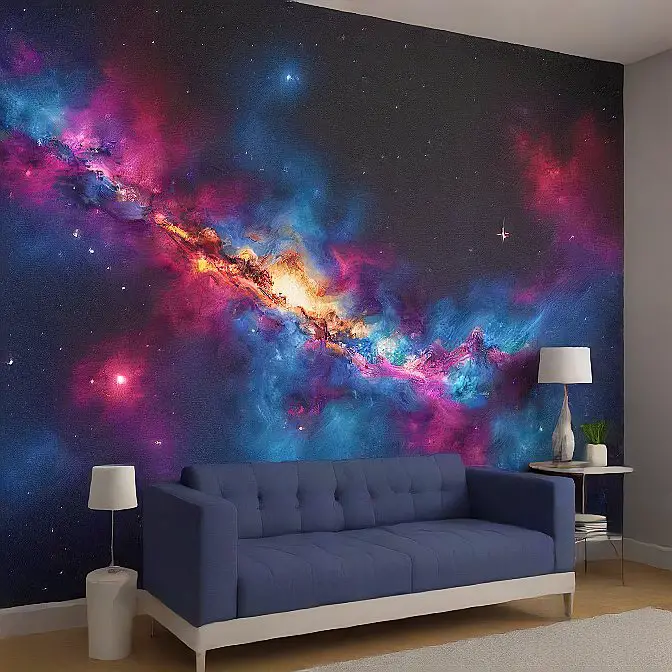
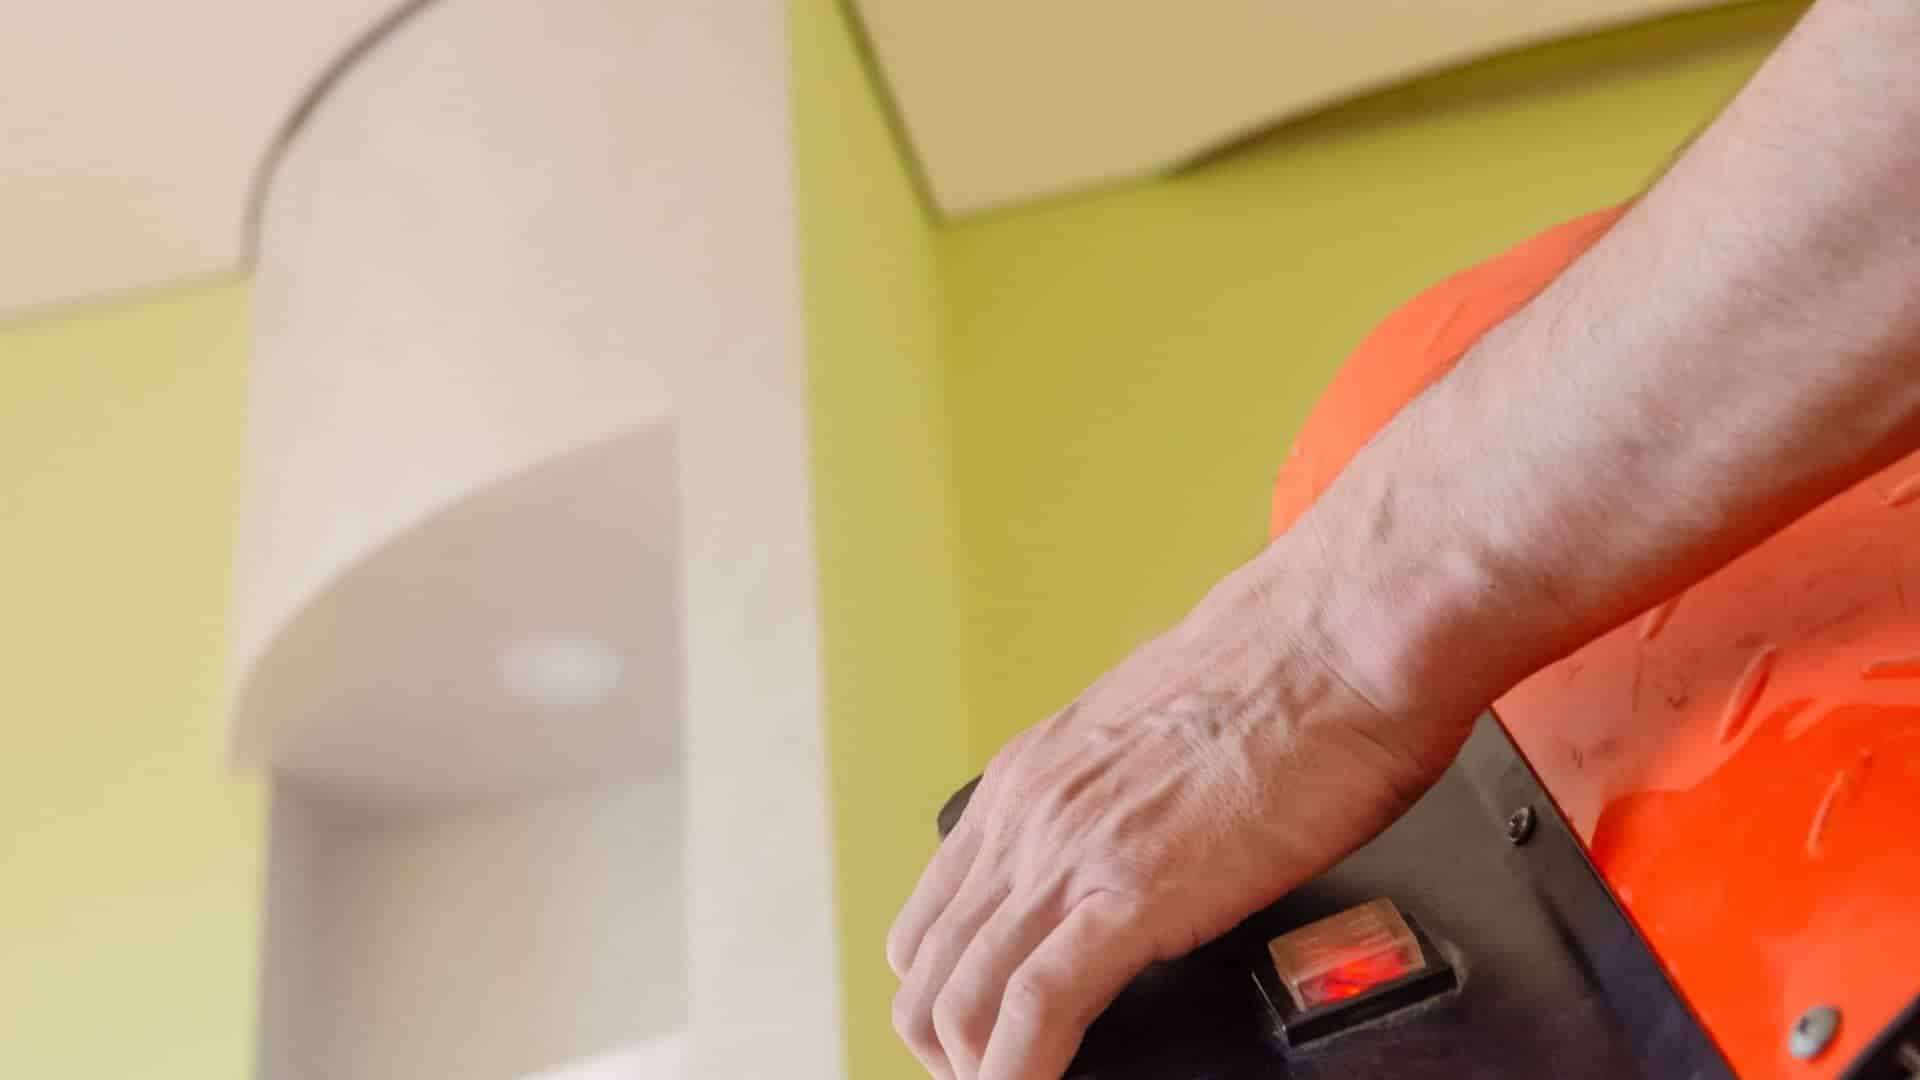
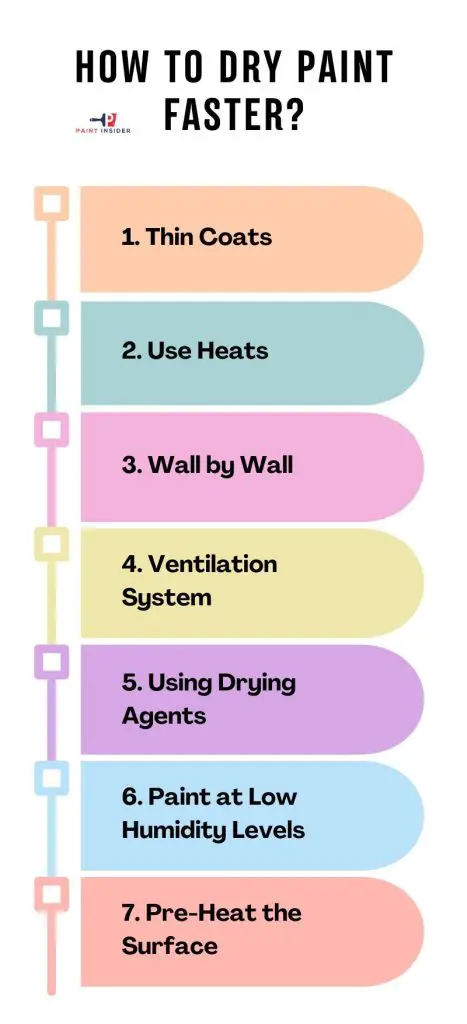
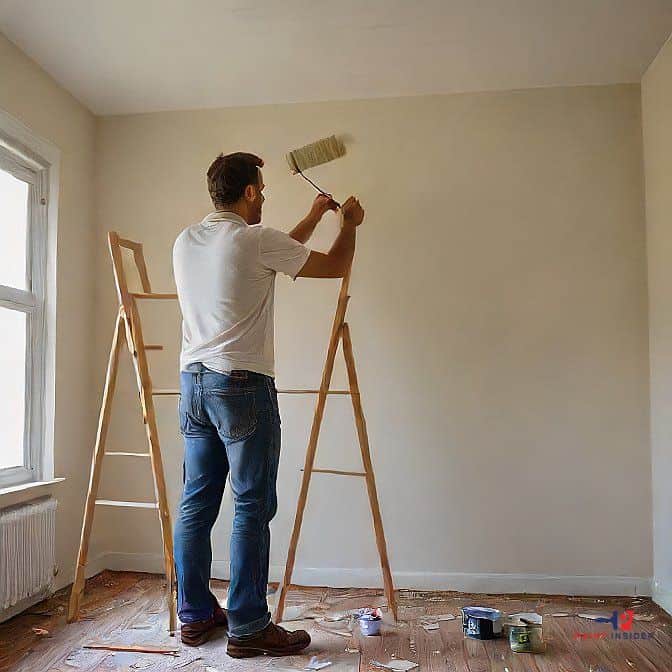

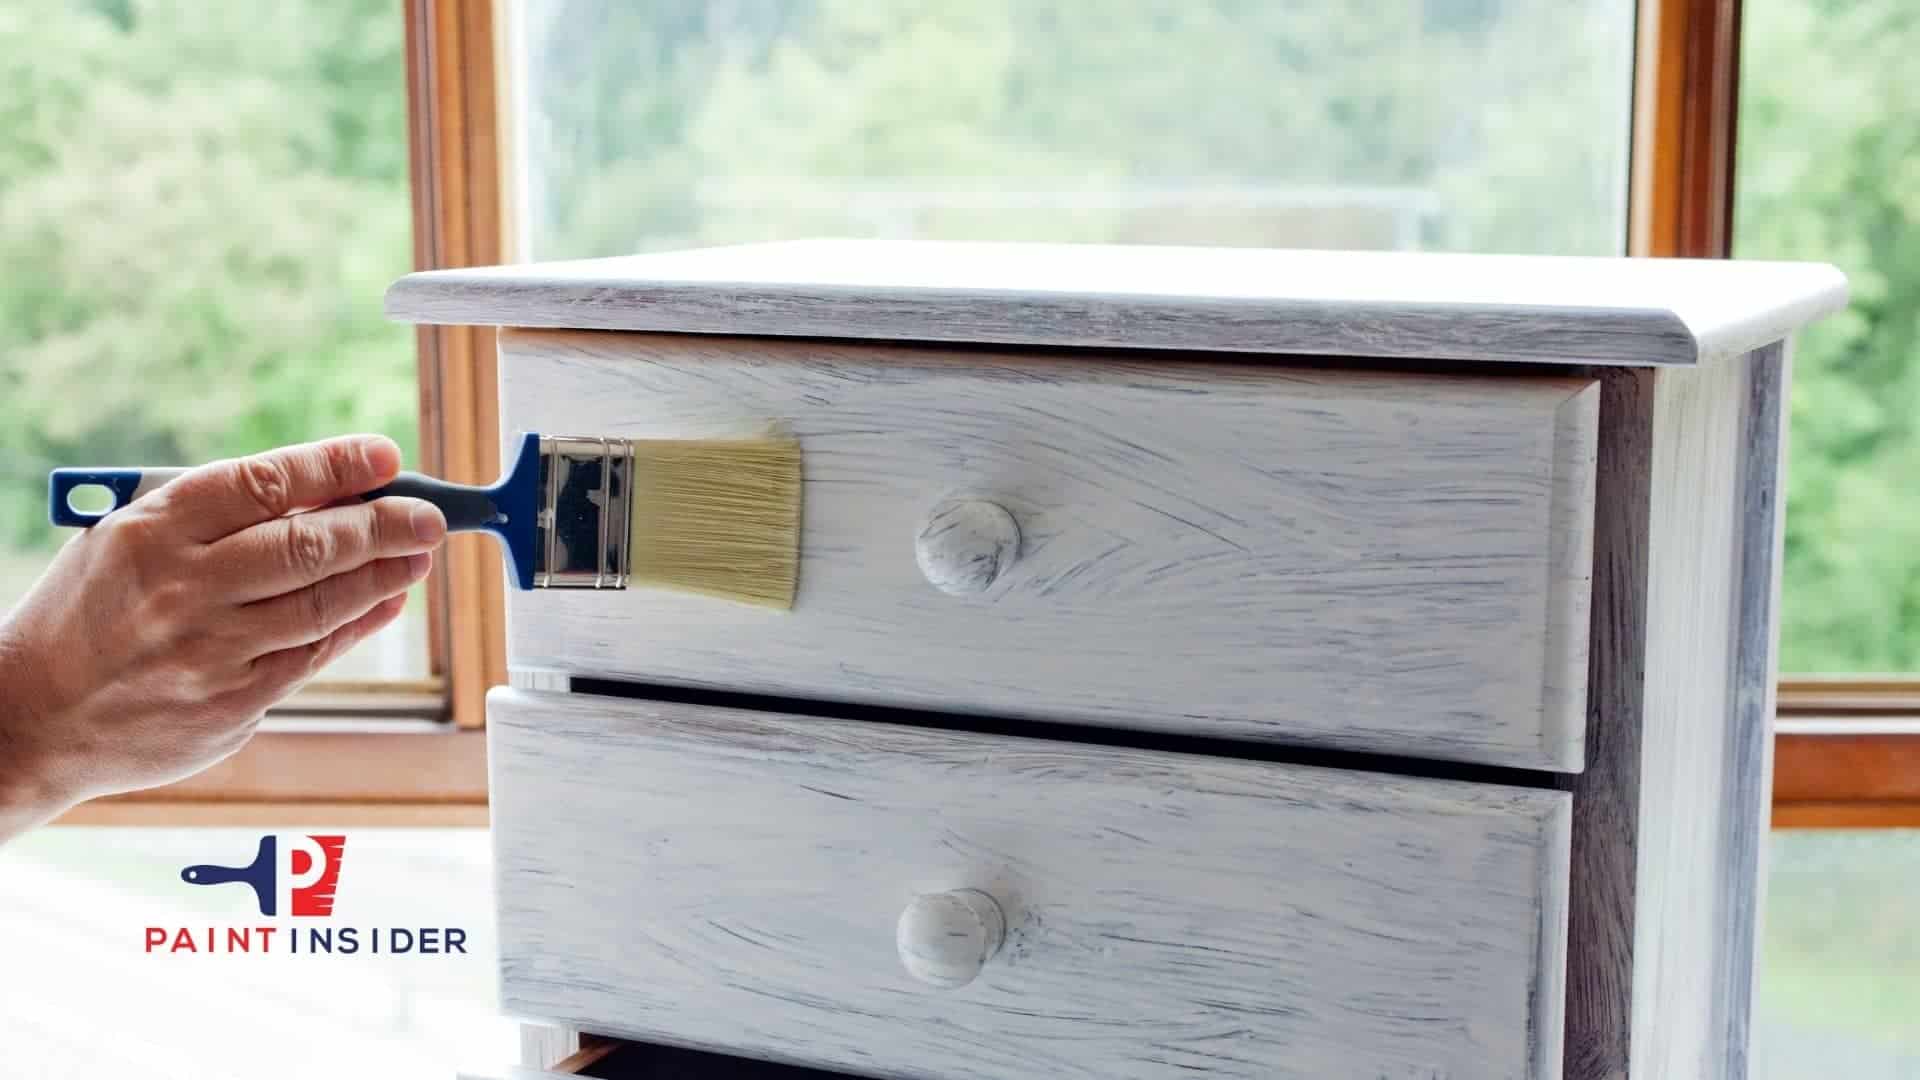
")


, Serenity Blue")
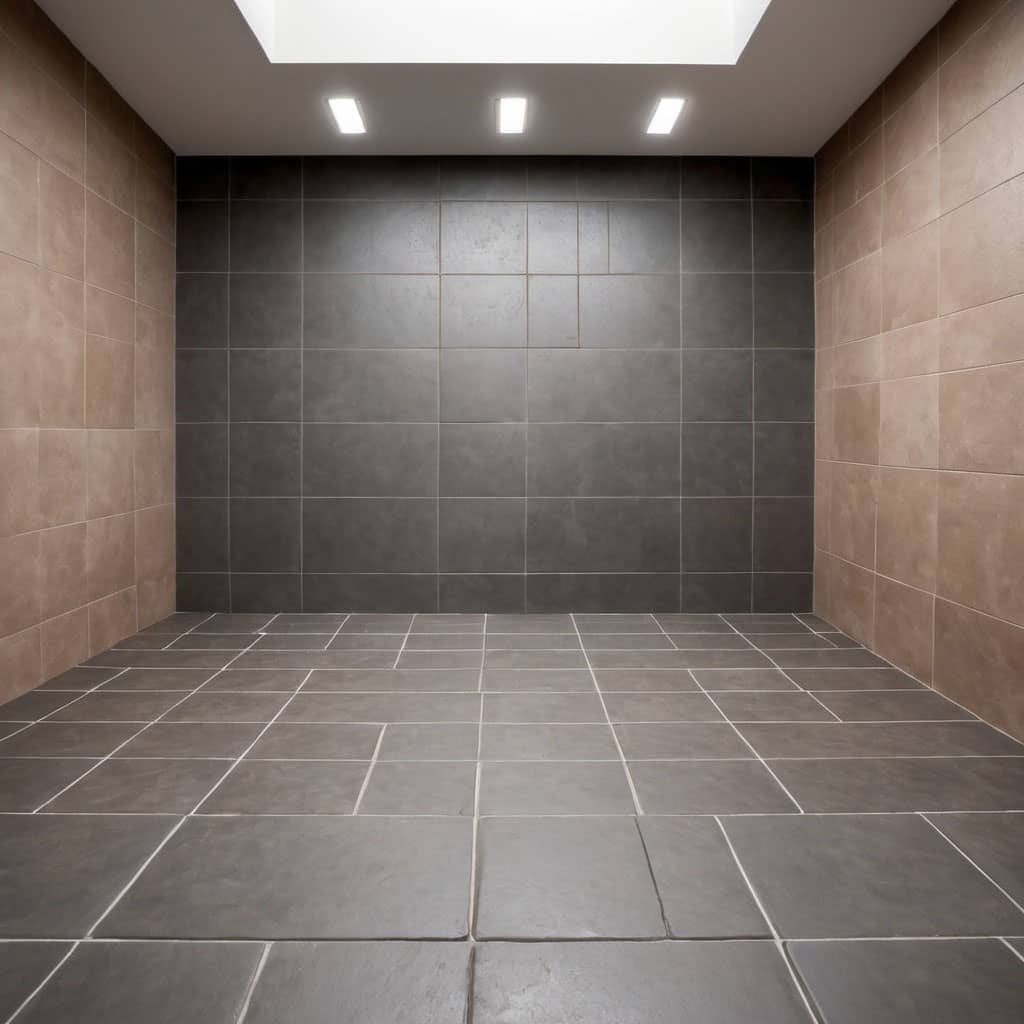

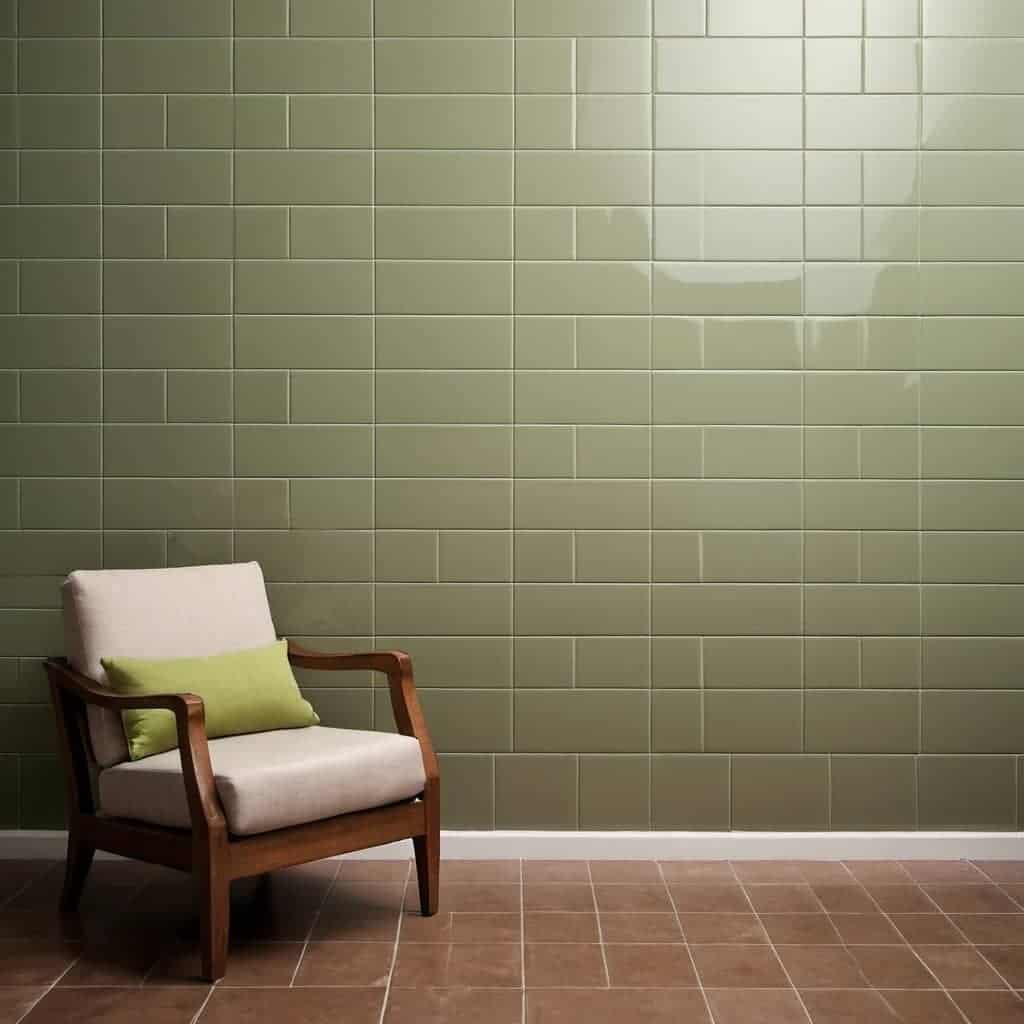
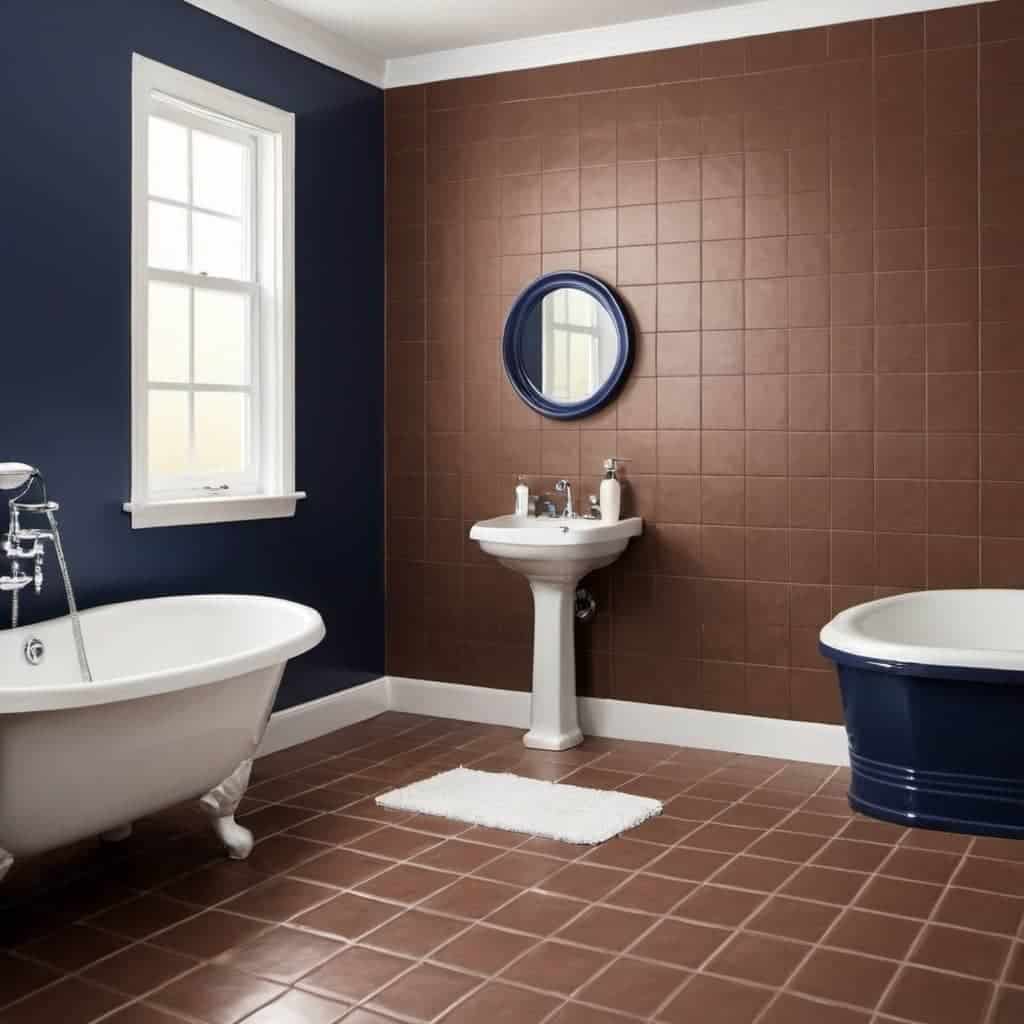
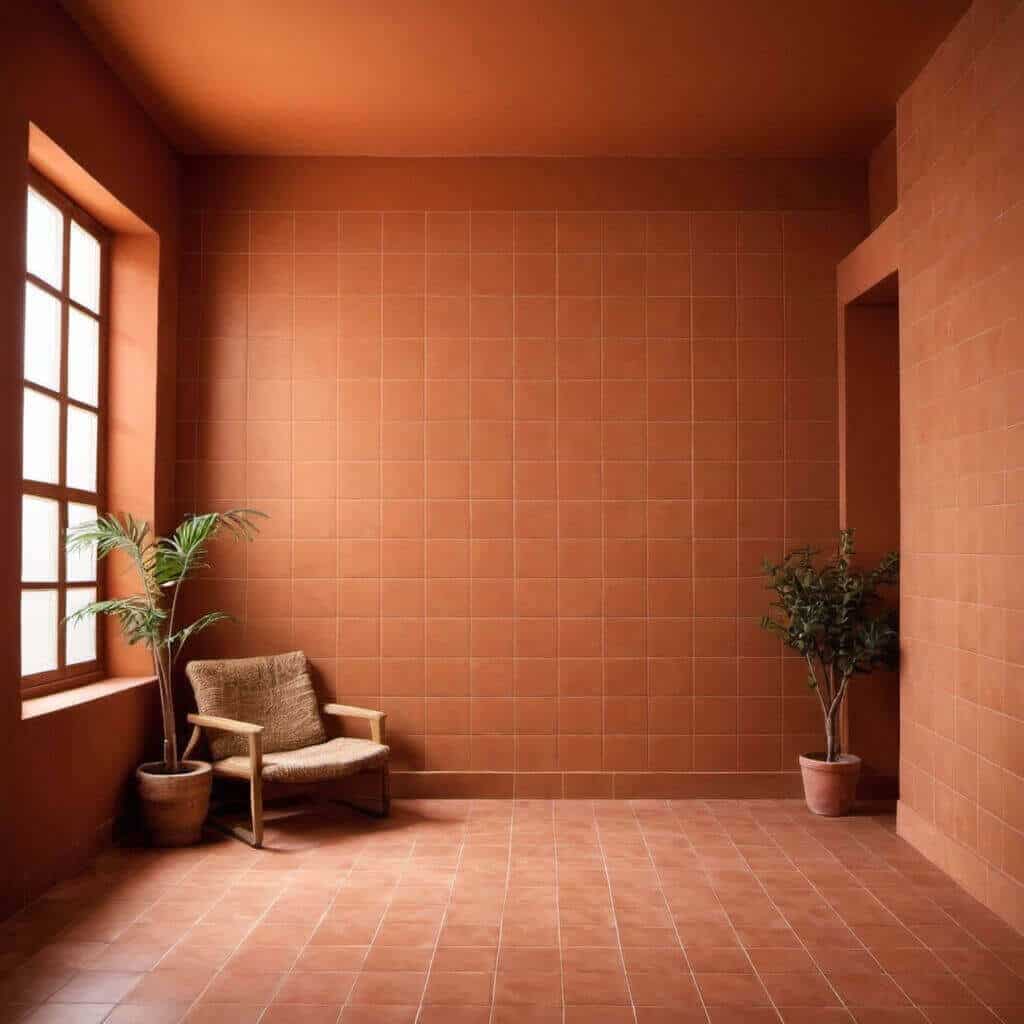
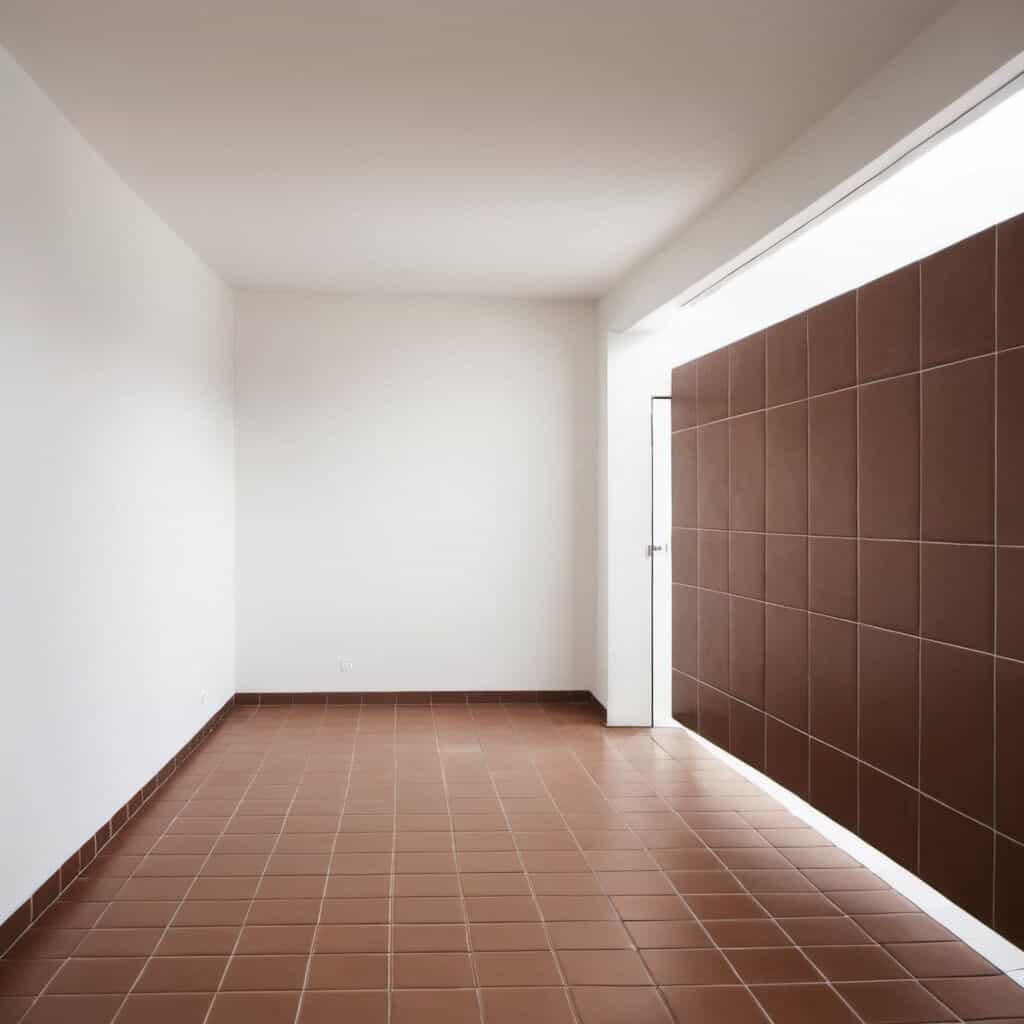
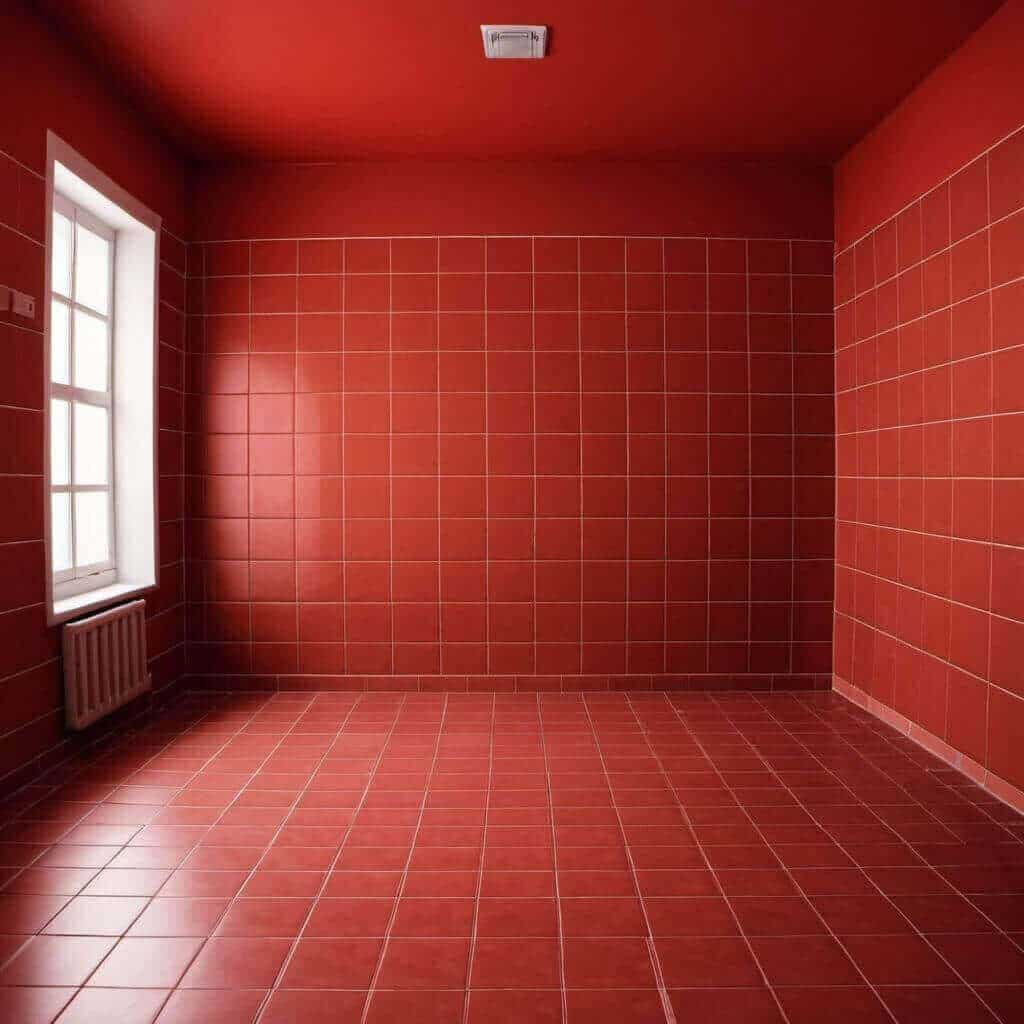
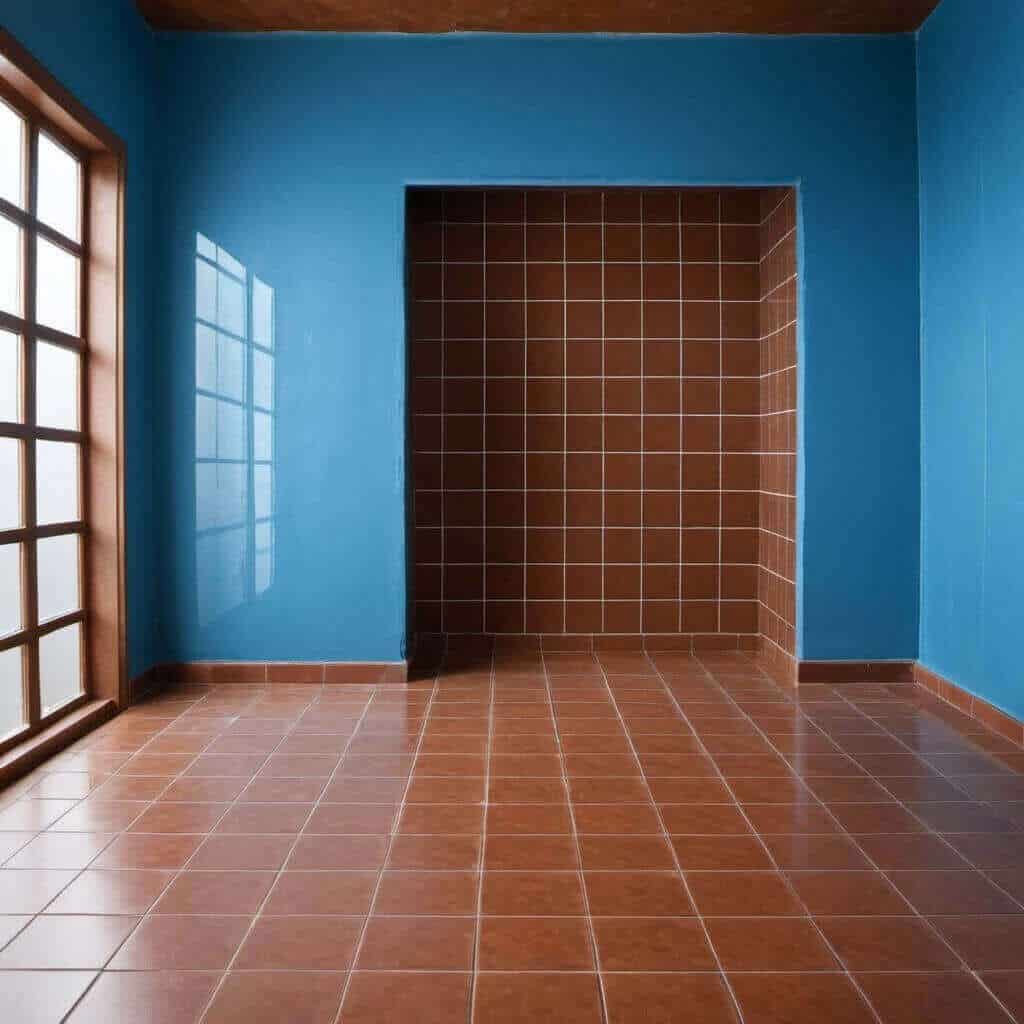
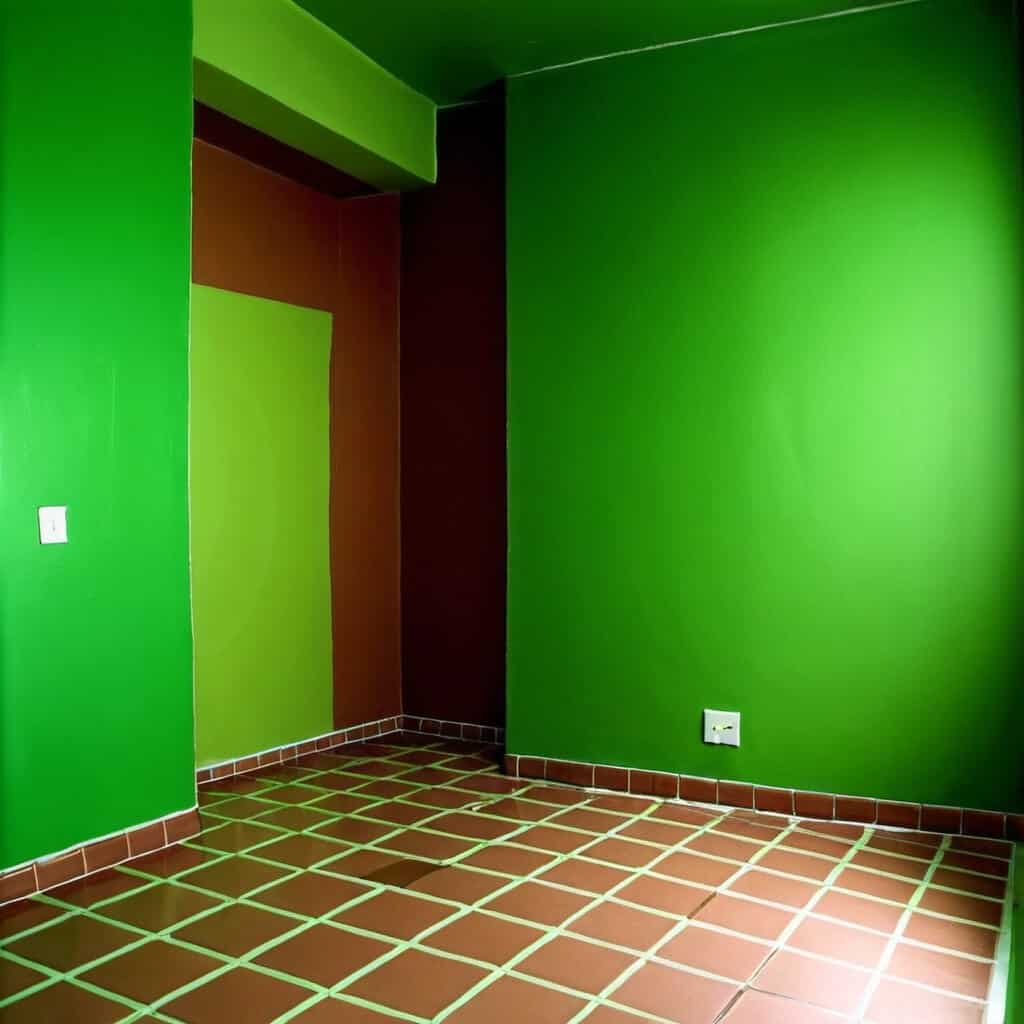
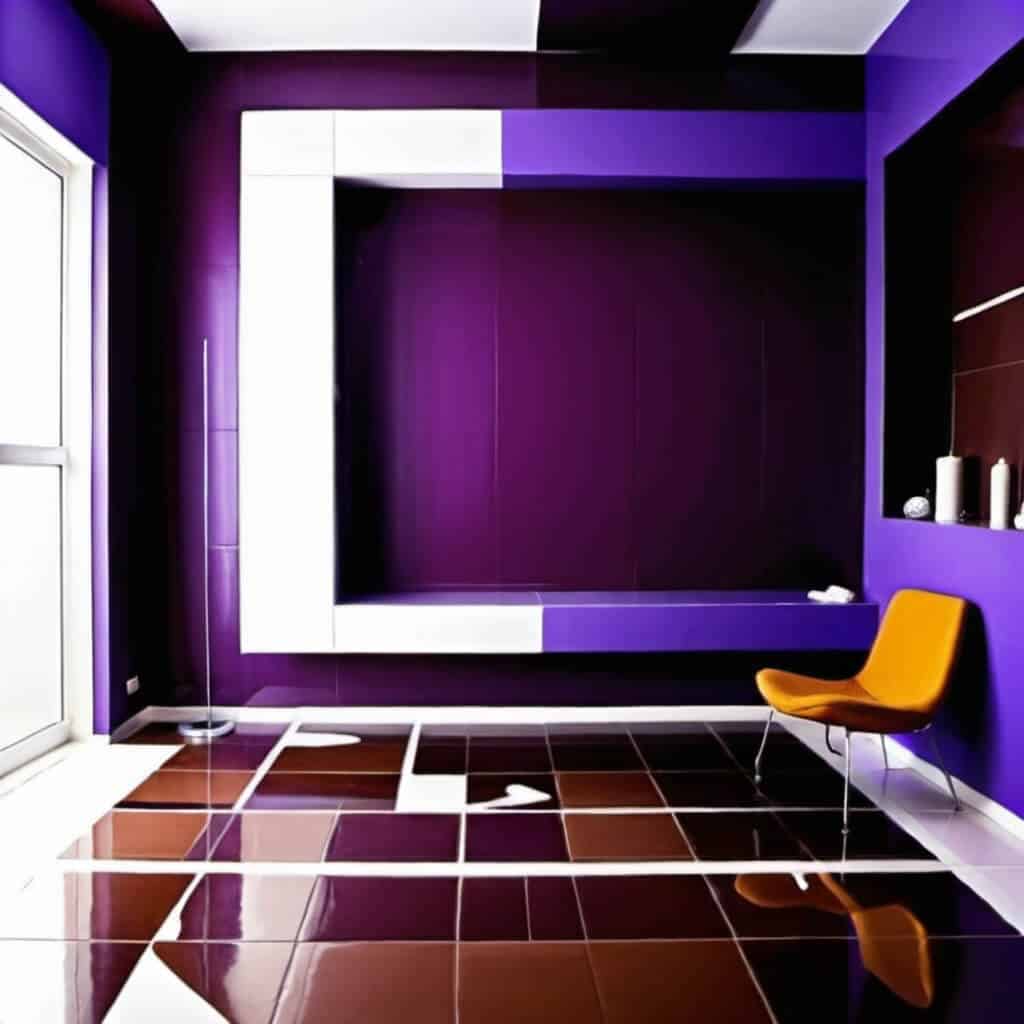
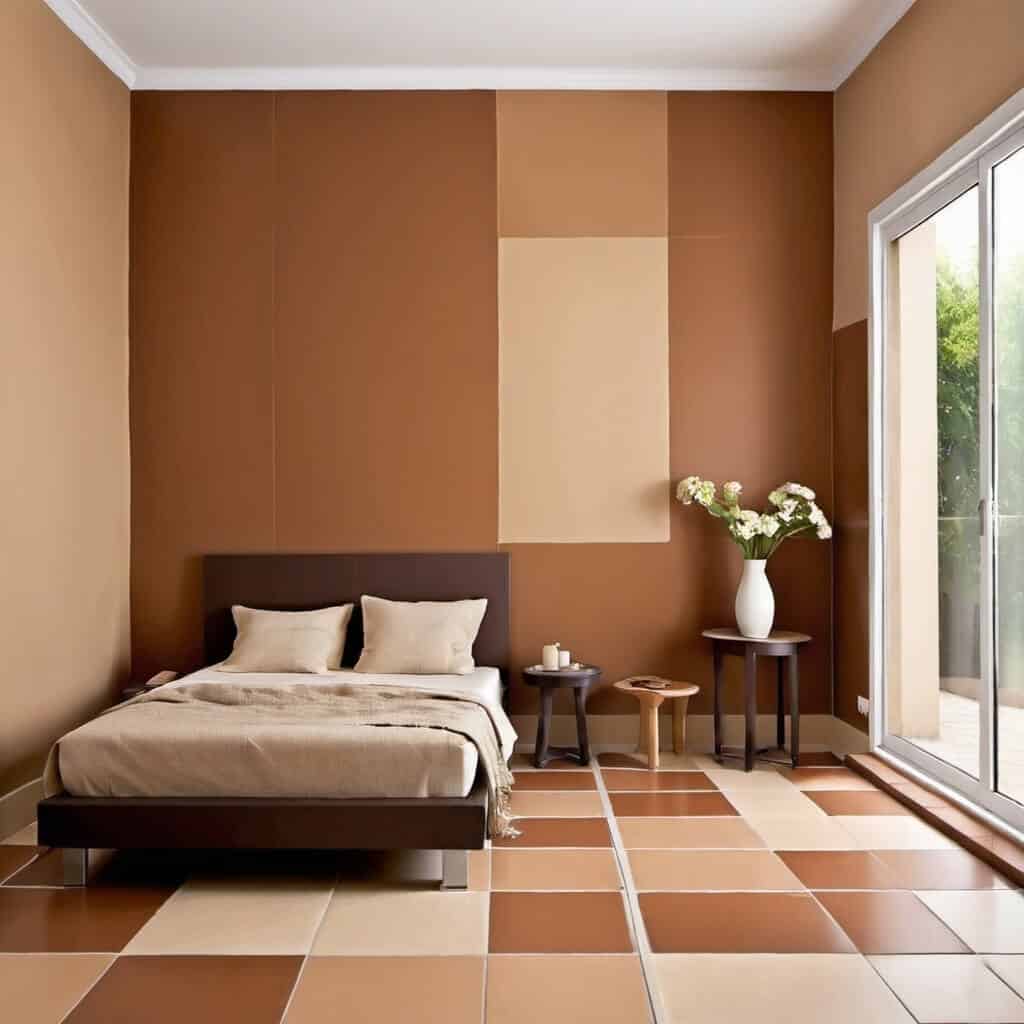
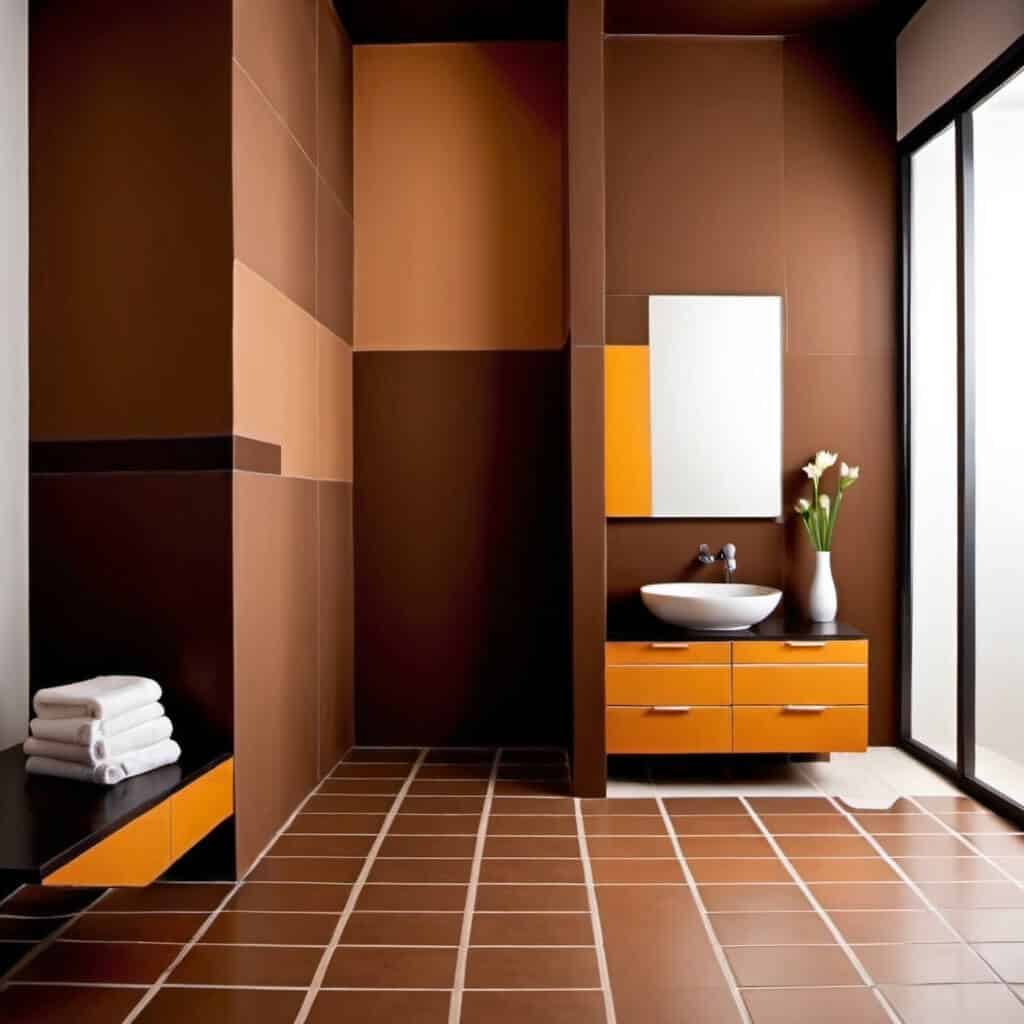
, White")
, Semi-Gloss White")


, Pure White")

, Eclipse")