You would want to paint your skateboard; learning how to paint a skateboard is pretty crucial. Keep reading for more content.
Introduction: Why Paint Your Skateboard?
Painting your skateboard is more than just an artistic endeavor; it’s a personal statement that reflects your individuality and style. Every brush stroke and color choice gives life to what is essentially a canvas on wheels, allowing you to transform your ride into a unique piece of self-expression. Whether you’re seeking to revitalize an old board or simply want to start fresh with something that embodies who you are today, the act of painting ignites creativity and brings a sense of ownership.
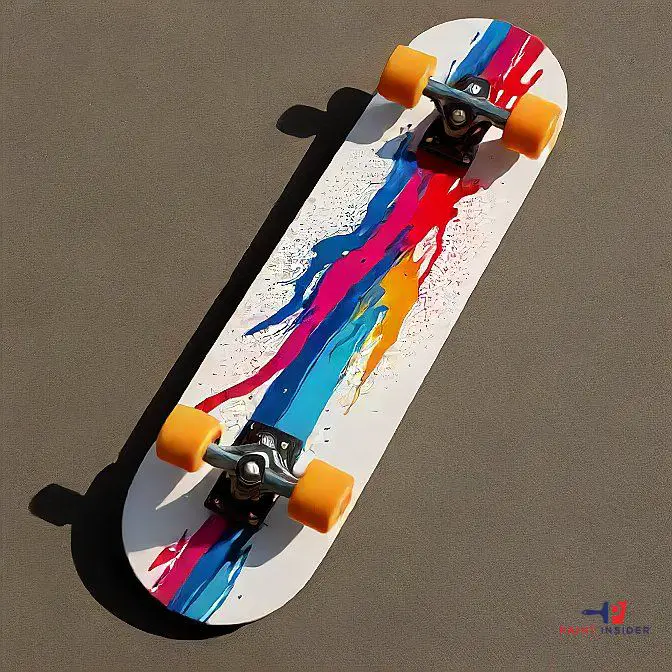
Choose a Design or Theme
Choosing a design or theme for your skateboard is an exciting part of painting it. It’s not just about looks; it’s a chance to show your personality and interests. Think beyond classic designs and explore themes that connect with you, like your favorite band, a beloved movie, or personal experiences that shaped you. Working with friends or getting inspired by art styles like street art or abstract art can spark creativity and offer new ideas.
Steps to painting a skateboard like a pro
Regardless of your painting the skateboard, it is always essential to learn all there is to know regarding skateboard painting. Customized Skateboard painting can be reasonably costly, which is why you should learn how to be a do-it-yourself person for painting projects like this. In the subsequent sections, you will learn four different methods to paint a skateboard with acrylic.
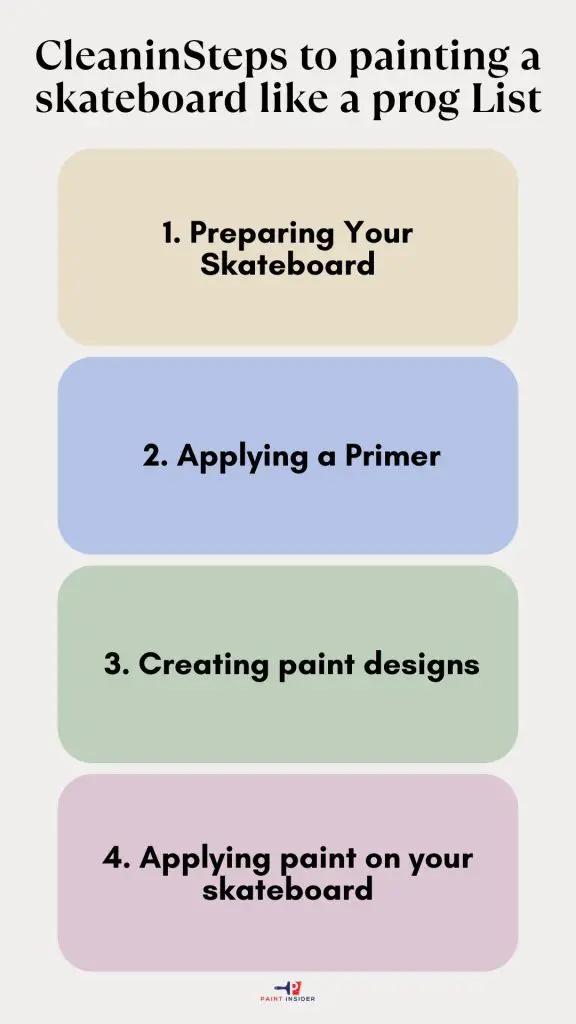
Step 1. Preparing Your Skateboard
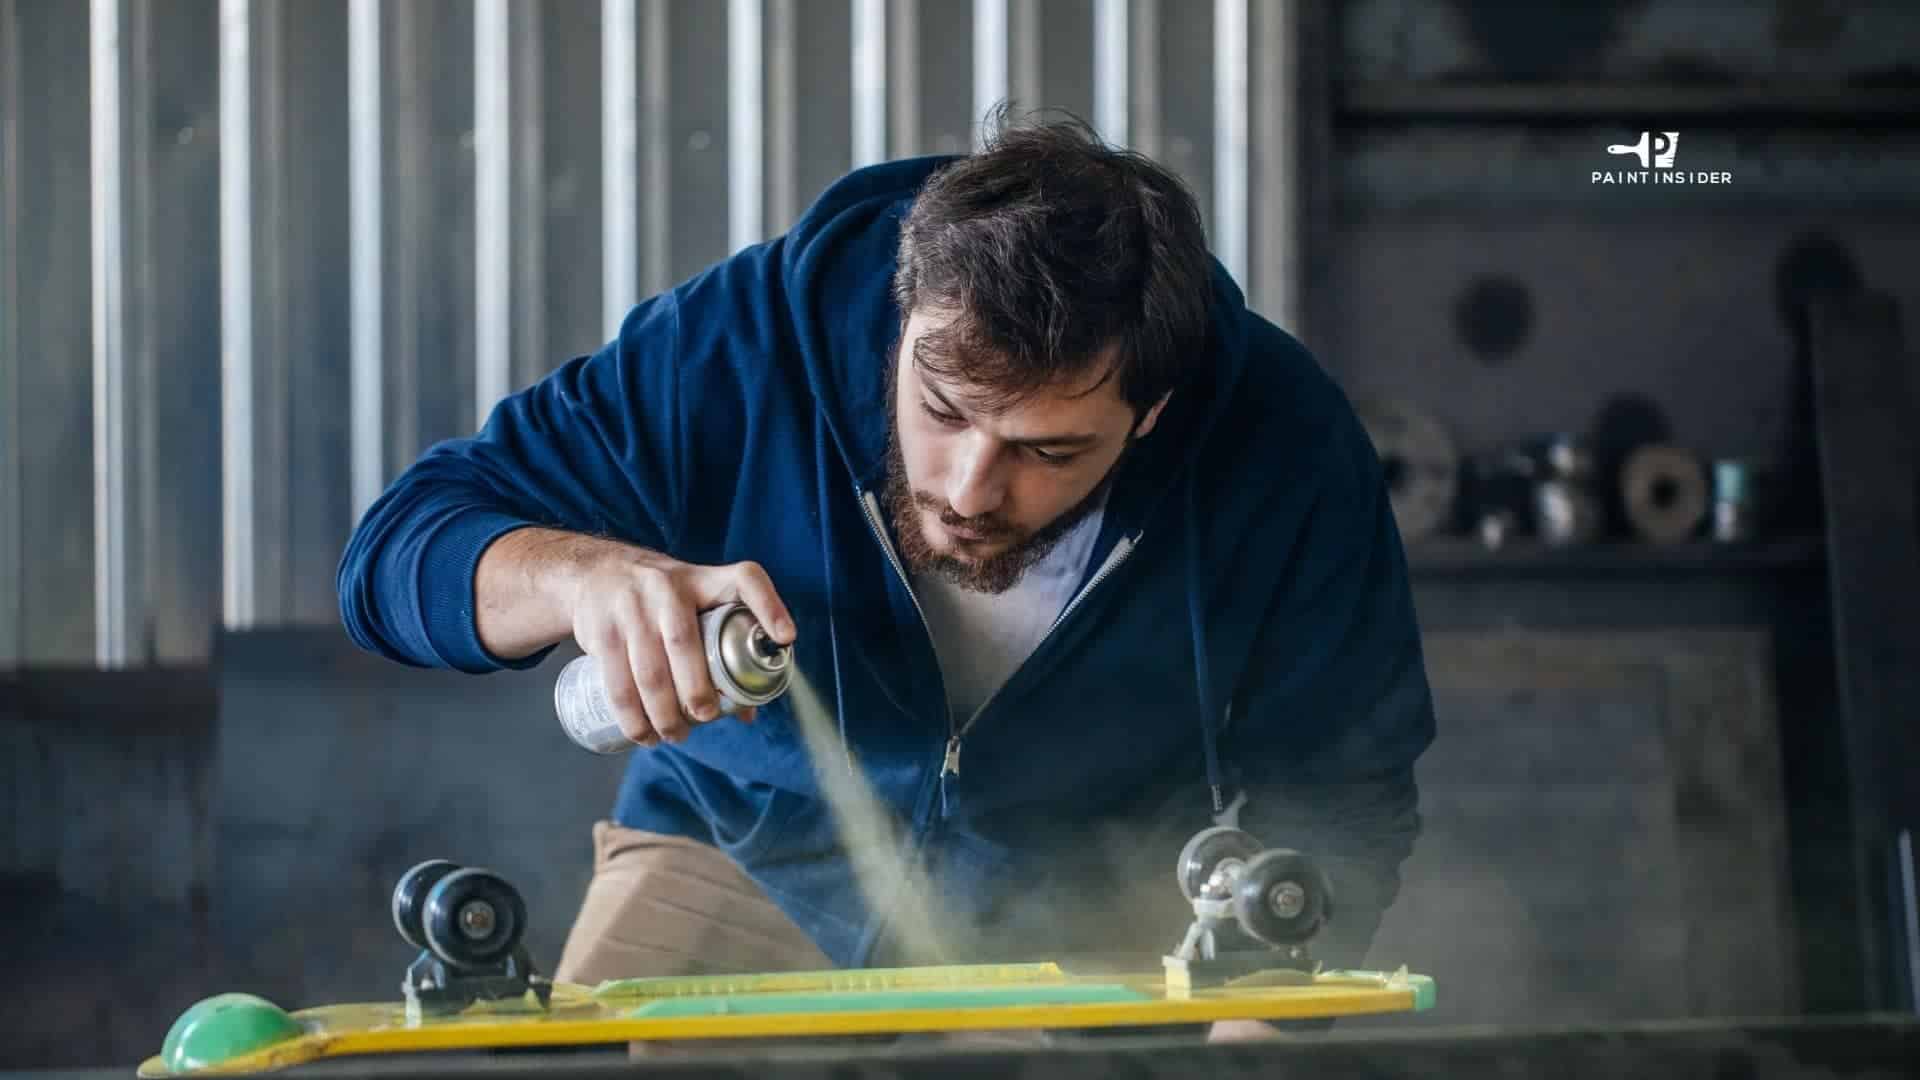
Put on your protective gear: It is common knowledge that preparing yourself is the first thing to do whenever you embark on your painting project. In this case, it would be best to adorn yourself in protective attire to shield your body from harmful paint fumes. Additionally, consider preparing your workspace to avoid doing a messy job.
Do a thorough sanding on the original painting: One of the initial preparations will incorporate sanding the original paint on your surface, as this will allow you to apply a new paint with much ease. An electric sanding machine will do the job satisfactorily.
To remove original designs from the surface of your skateboard, it would be best to press your hand firmly on the designs for better results. Then, finish off by using fine-grained sandpaper to achieve a smooth and even surface.
Scrub away any dust residue: When preparing your skateboard for painting, your primary concern is to achieve a smooth and even finish. With that in mind, use a stiff-bristled brush to scrub off all dust residue from the surface of your skateboard.
Do repairs on your skateboard if necessary: In the course of your preparatory activities, you may notice that the surface of your skateboard has a few blemishes that might affect your painting. Be sure to do light repairs on your skateboard by using suitable sealants to cover scratches and cracks.
Mask the screw holes: Certain parts of your skateboard might not require to be painted after all, so it would be best to conceal them with painter’s tape. Areas like screw holes should not be painted.
Step 2. Applying a Primer
Do light sanding for a smoother surface: Let your primer dry properly, and then do a light sanding to achieve an even smooth surface. Be sure to use fine-grained sandpaper at this point. Note that sanding is meant to minimize the bumps on your skateboard after you are done with your painting.
Apply a thinner on your skateboard: Painting a skateboard will require you to follow all steps to the letter; one such crucial step is applying a suitable thinner immediately after doing your light sanding on the primer. Be sure to use an acrylic-based primer for best results preferably, lacquer thinner.
Step 3. Creating paint designs
Master the process: Because there is no room for mistakes and guesswork when painting your skateboard, be sure, you fully master the basics as regards design creation on your skateboard. An excellent way to go about design creation is by using stencils or impressions using masking tape. Then, use your tape to create designs and patterns of your choice.
Create design sketches in advance: We mentioned earlier the need to prepare for your painting project properly. With that in mind, it would be helpful to create sketches of your preferred designs on the skateboard in advance. Then, use your craft skills and suitable tools to create your designs.
Proper choice of colors: Creating designs on your skateboard might involve more than one color; in that case, be sure to choose your colors correctly to create stunning designs. For instance, if you intend to use three colors in your design, ensure you have three different colors for your design project.
Step 4. Applying paint on your skateboard
Start with the undercoat: Now, here comes the most critical stage of your painting project(painting). Because the surface of your skateboard is ready to be painted, it would be best to start with an appropriate undercoat. The undercoat will also act as a guide to making your impressions bolder.
Be sure to choose the right color to use as your primer. A denser color will give you the best results. Note that it would be best to spray your undercoat for better bonding.
Attach your impressions by using painter’s tape: Use your masking tape to attach your impressions to the surface of your skateboard. Keep in mind that the areas concealed by your impressions will eventually remain unpainted with another color. Spray your skateboard with another layer while aiming for a consistent and even coat.
Take out the impressions attached earlier: It is time to take out the impressions you attached in the preceding step. Be sure to do it gently to avoid damaging your paintwork.
Do a final sanding for an even and smooth surface: Let your paintwork dry properly, and then do a final sanding on your paintwork for an even and smoother surface. Be sure not to overspend your paintwork because you don’t want to start over the whole project. Use a damp towel to wipe the sanded dust particles and let your skateboard dry before you can start your skating activities.
For obvious reasons, you may decide to paint your skateboard to give it a brand-new look. However, you may find it challenging to achieve this feat if you don’t have the foggiest idea of how to go about it. With that in mind, we hope that you will put the tips discussed in this article whenever you decide to paint your skateboard. Hopefully, this will help.
Conclusion: Enjoy Your Custom Skateboard!
As you roll away on your newly designed custom skateboard, you’ll not only appreciate its unique aesthetic but also the journey it took to bring it to life. Painting a skateboard is more than just adding color; it’s an expression of identity and creativity that can resonate with every rider. Your carefully selected design transforms the board into a personal canvas, reflecting your interests, values, and style a remarkable reminder of who you are as you navigate through life’s adventures.
Embracing the art of customizing your skateboard creates a deeper connection between you and your ride. Each brushstroke tells a story, whether it’s inspired by nature, urban settings, or even abstract concepts. Plus, maintaining that fresh look not only enhances performance but also sparks conversations with fellow skaters who recognize the passion behind your work. So grab those paints and embrace this opportunity; every time you step on that board, you’re showcasing not just a mode of transport but a piece of yourself ready to take on new horizons!