
In this article, you’ll learn the simplest procedure for painting stainless steel. The procedure here you’ll find is for those who want to paint the stainless steel at home, not professionals.
Are you looking for how to paint the stainless steel? As stainless steel is non-porous like porcelain, It needs exceptional preparation before you can start painting. When you paint your steel, your lichen will undoubtedly get a facelift. Can you paint stainless steel? Yes, you can! But you need some instructions to follow before and after painting. Let’s move towards the preparation you need to paint the stainless steel sink. First of all, pick up trisodium phosphate and start wiping your stainless steel surface. After doing this procedure, your surface will be more responsive to paint. If you don’t have trisodium phosphate, you can also use another method to sand the surface down. It’ll help you absorb the paint more efficiently and quickly.
Introduction: Importance of Painting Stainless Steel Sinks
Painting a stainless steel sink can transform your kitchen without the need for costly renovations. Start by ensuring that the surface is impeccably clean, use a degreaser to eliminate grime, dirt, and old coatings. After thoroughly drying the sink, lightly sand the area with fine-grit sandpaper to create a texture that helps the paint adhere better. Don’t skip this essential step that is often overlooked but crucial for achieving lasting results.
When it comes to choosing paint, opt for specially formulated epoxy or acrylic paints designed for metal surfaces; these offer durability under daily wear and exposure to water. Apply multiple thin layers rather than one thick coat, allowing adequate drying time between applications to prevent drips and runs. Finally, seal your masterpiece with a high-quality clear coat after the paint has fully cured to enhance longevity and shine. By transforming an ordinary fixture into a stylish focal point of your kitchen, you not only elevate its aesthetic appeal but also extend its life significantly.
Steps To Paint A Stainless Steel Sink
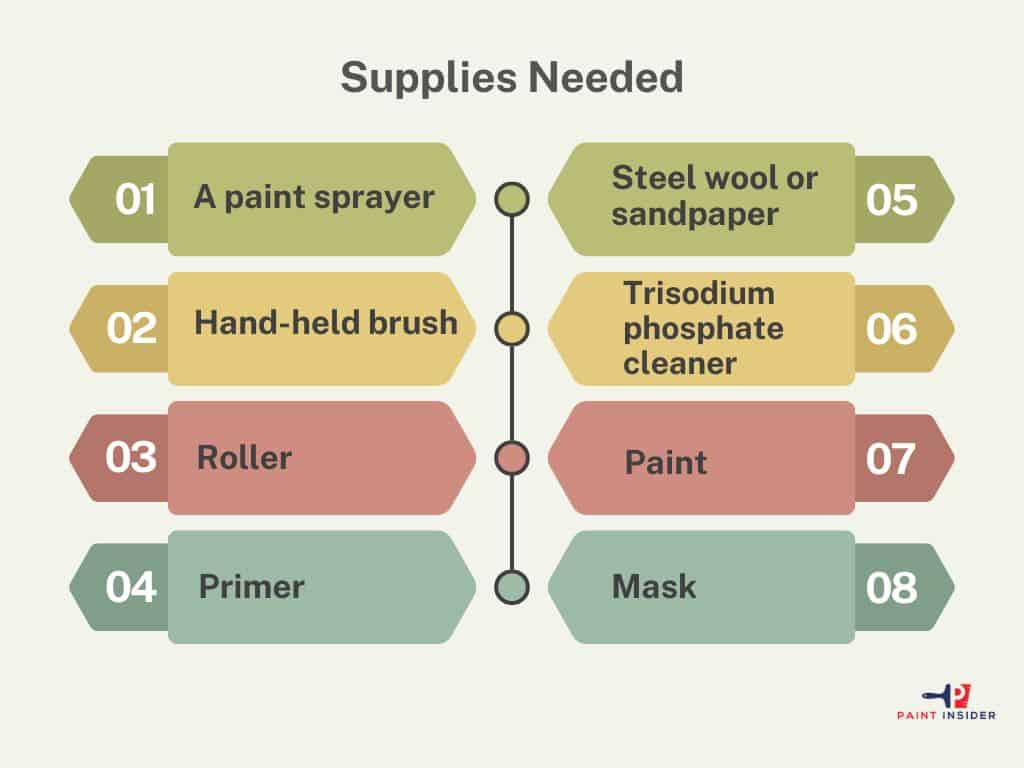
Supplies Needed:
- A paint sprayer
- Hand-held brush
- Roller
- Primer
- Steel wool or sandpaper
- Trisodium phosphate cleaner
- Paint
- Mask
Prepare Your Sink
Let’s start with the essential step, which is preparing. If you start painting before preparation, it will give you unsatisfactory results. You are painting a stainless steel sink, so keep in mind that steel is a very hard material, and it becomes very difficult to stick paint. Now spray on trisodium phosphate liquid (TSP) and cleanse the surface. It is necessary for your surface that the TSP must apply to the wall surface where you want to paint. When you apply the paint, you’ll notice that all the shine of your sink has disappeared. Another method to get rid of the shining surface is to use sandpaper and start scraping the surface of your sink. Be sure that you scrub the whole surface. Select one of the methods that are easy for you. Both these methods help to dull and rough your surface.
Choosing the Right Paint for Metal
When it comes to painting metal surfaces, especially for projects like rejuvenating a stainless steel sink, selecting the right paint is paramount. Specialty paints designed for metal substrates are engineered to adhere effectively and resist the common issues of rust and corrosion. Look for products labeled as metal-specific, which often feature a primer component that enhances bonding and durability. Additionally, consider finishes that not only blend aesthetically but also include protective elements against scratches and stains crucial in high-use areas like kitchens.
It’s worth noting that preparation plays an equally critical role in the success of your project. Thoroughly clean the surface with soap and water, followed by a degreaser to remove any lingering oils. Once dry, lightly sand the sink’s surface; this may seem counterintuitive on stainless steel but will provide texture for better adhesion. After choosing your paint wisely including options like epoxy or acrylic enamel proper application techniques such as using a spray gun or foam roller can yield professional-looking results while minimizing brush strokes or drips. Ultimately, a well-chosen paint not only revitalizes your kitchen fixtures but also adds long-lasting value to your home’s aesthetic appeal.
Applying Primer
Now it’s time to prime your surface. Pick up the hand-held brush, or you can also pick a roller and start priming on the surface of the stainless sink. When you use the paintbrushes, they will give you a rough look. But if you don’t want a rustic look and want even coverage, you use a sprayer. The sprayer is the best option for a smooth finish. Stainless steel primer helps prepare your surface and makes it more magnetic to stick the paint evenly. Depending upon your surface, apply a coat of primer. If your surface wants more than one coat, apply a double coat. Apply the 2nd coat until you notice that your 1st coat dries completely. When your last coat has dried completely, move towards the next step.
Scrape The Sink
After applying the primer, it’s time to scrape the sink. We will again scrape the sink to rough the surface. For this step, we will use sandpaper or steel wool. Be aware not to use the TSP here; if you use it here, your primer will remove it from the surface. But you can use sandpaper. Use the sandpaper in the same way you had applied it before. This method will help you stick to the colored paint more efficiently.
Apply the First Coat Of Paint
Your surface is ready. Now you can apply the paint. Pick up your pigmented paint and start painting the first coat on your surface. You can pick up any method from these two. The first option is that you can use normal paintbrushes or rollers. If you are using brushes, you must be conscious while painting. Make sure to use long and smooth strokes. Always paint in one direction. But if you’re using a sprayer, you don’t have to be conscious. Using a sprayer will give a more professional and more consistent look that is impossible with normal paintbrushes. If you are serious and want a finished look, use only a sprayer. If it’s not available, you can rent it. As you do with the primer, dry it thoroughly until you move towards the next step.
Scuffing And Applying Another coat
As you have applied the first coat of paint on your stainless steel, now again scruff. Scruff the surface in the same way you did before using the same material ( sandpaper and steel wool). The repeated use of sandpaper may look unusual, but it is important for the finished look. When you sand the surface completely, it’s time to apply another coat. Apply the coat very smoothly and evenly to get the desired results.
Coating for stainless steel sinks depends upon your stainless steel. Most stainless steel requires at minimum two coats of paint.
Allow To Dry And Apply Protective Gloss
Let the paint dry completely. When you notice that everything is dry completely, it’s time to apply the final protective coat. Another option to use is the high-shine product. You normally called ( toilet glaze). It means that your final glaze will be impermeable.
Here are some directions that you must follow while applying the protective gloss.
- Wear a mask properly because it has strong fumes
- Work in a well-ventilated area
All these steps will help you a lot in painting stainless steel. You can notice it is a very easy method. Make all the instructions in front and start painting. One to remember in painting stainless steel is texture; Texture is key when dealing with stainless steel.
Tips for painting the stainless steel
The use of sprayer paint is very good for stainless steel. But try not to use the spray paint because it won’t stick to the stainless steel surface properly. The best idea is to buy canned paints and use the spraying machine to paint and get professional results.
Never use the paint directly on the stainless steel. For painting the stainless steel sink, you need proper preparation. The first scruff, apply primer and then paint the surface.
Never use acrylic paint on the stainless steel. If you are using acrylic paint, first, it may not be food-safe, and the second one is that it gets cracks after some time. Epoxy paint sticks to stainless steel very smoothly.
Maintaining Your Newly Painted Sink
To keep your newly painted sink looking pristine, it’s essential to establish a regular maintenance routine that combines gentle cleaning with protective measures. Start by using soft sponges or microfiber cloths when wiping down the surface this prevents scratches and maintains the integrity of your paint job. Opt for pH-balanced cleaners specifically designed for painted surfaces, harsh chemicals can degrade the finish and lead to premature wear.
Additionally, consider periodic touch-ups to address minor chips or scratches that may occur over time. Keep a small amount of leftover paint in a sealable container for easy access, this proactive approach will help you maintain your sink’s flawless appearance without needing extensive repairs later on. Finally, avoid leaving standing water in the sink for extended periods and apply a thin layer of food-safe mineral oil occasionally this not only enhances shine but also creates an extra barrier against moisture-related damage. Proper care goes a long way in extending both the life and beauty of your freshly painted stainless steel sink.
Conclusion: Enjoying Your Fresh Look Sink
Transforming your stainless steel sink into a fresh focal point of your kitchen isn’t just about aesthetics; it’s a statement of care for your living space. By taking the time to thoughtfully paint and customize this functional piece, you’re embracing creativity while enhancing its utility. A newly painted sink can uplift the entire look and feel of your kitchen, serving as a reminder that even the smallest details can make a significant impact.
Moreover, don’t underestimate the power of maintenance following your painting project. Proper care will ensure that your freshly updated sink remains vibrant for years to come. Use gentle cleaners specifically designed for painted surfaces to avoid damaging that pristine finish you worked so hard to achieve. As you enjoy the benefits of this revamped centerpiece, acknowledge not only the visual upgrade but also how it reflects an intentional lifestyle one where you express individuality through every corner of your home. Embrace this fresh-look sink as a testament to both style and functionality in an ever-evolving culinary hub!