In this article, I‘ll tell you how to paint a lamp with the easiest procedures that you can do at your home with simple things that are accessible to us.
Do you want to do something creative? Do you want to know how to paint lampshades? Painting a lampshade is the best way to alter an old shade and make it fantastic to meet the standard of your home decor. Due to advancements in the decor field, experts have introduced different ways of making your furniture attractive at home. After much research and observations, we have designed the lampshade painting ideas that you can do quickly at home. The steps are too easy; even if you have no experience in painting, you can do it.
The most important thing you have to consider is to start when you have enough time to complete the process at once because doing breaks in between will affect the results. So, let’s begin.
Introduction: Transforming Your Lamp with Paint
Painting your lamp is a great way to personalize your space. You can take an old lamp and make it new with just a few paint coats. This lets you match your decor and show your style in ways that store-bought lamps can’t.
When painting, choose colors that fit your personality or mood. Soft colors create calmness, while bright ones energize a room. Also, think about adding texture with techniques like sponging or stenciling to make your lamp stand out. With little cost and creativity, you can turn any ordinary lamp into a unique piece that represents you and improves your home.
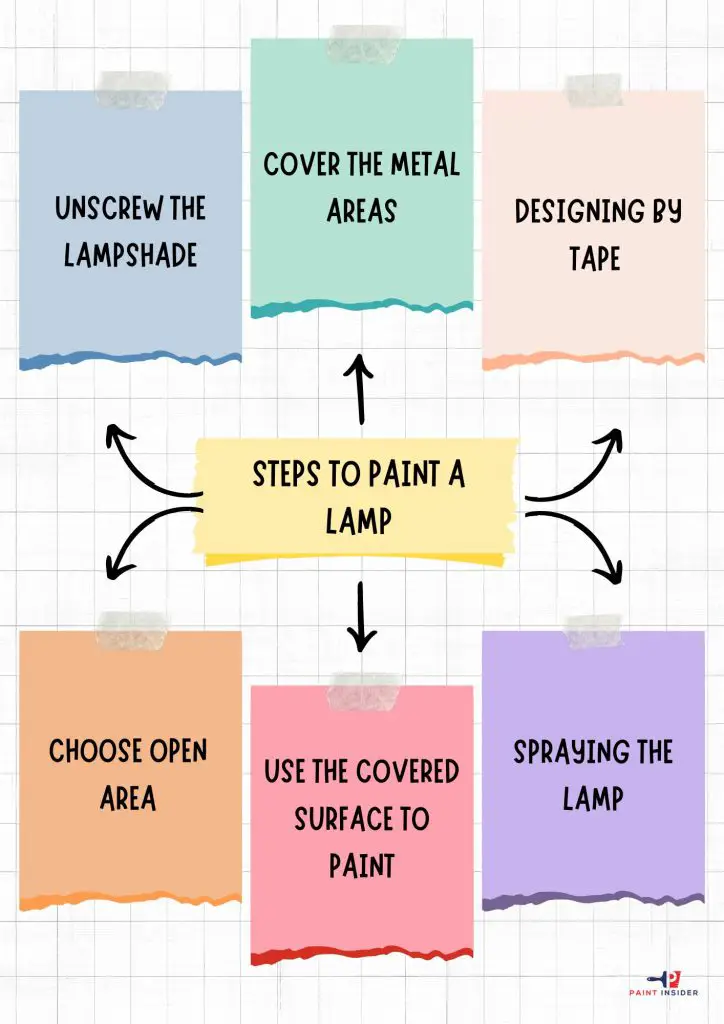
Steps To Paint A Lamp
Turning an old lamp into a beautiful centerpiece is a chance to show your creativity, not just change its color.
Supplies Needed
- Lamp
- Newspaper
- Plastic bags
- Masking Tape
- blue painter’s tape
- Spray paint
- Fabric paint
- Acrylic paint
- Chalk paint
- Paintbrush
- Water cup

Step 1: Unscrew The Lampshade
The first step is to remove all the screws from the lamp that holds the lampshade. Most of the lamps have an attachment in the middle of the lap that holds the lamp base and lampshade, so try to remove it. When you take your lampshade off, then move towards the next step.
Step 2: Cover The Metal Areas
When you are painting the lampshade, you just need to cover the metal areas. So, now our next step is to cover them. To protect the metal parts, we use tape, newspaper, or plastic bags. Now pick the plastic bag or newspaper, whichever you want, and cover the area you don’t want to paint. If you don’t want to use the bags and newspaper, another idea is to use the tap only. Just cover the metal area with masking tape, or you can also use blue painter’s tape. By covering the tape, you have sealed the site, whichever you don’t want to paint. But it’s always the best idea to cover the metal areas with plastic bags.
Step 3: Designing By Tape
Tape can also help in designing your lamp. Design the tape in the pattern you want. You can try beautiful patterns on the tape. You can make zig-zag or beautiful design patterns on the lampshade.
Step 4: Choose Open Area
Place some newspaper or waste paper on your surface. To protect the surface, use the 3 -4 layers of your newspaper. It‘ll help in protecting your surface from spray paints. Always choose a flat surface for your paint. You can paint on the table or a smooth surface. Don’t use spray paint in the internal environment. It can cause danger for you. An open and ventilated area like open grounds or near open doors is the best to use the spray paints.
Step 5: Use The Covered Surface To Paint
Pick your lamps in the middle of your covered areas of the newspaper. And if your lampshade is oversized, then use more newspaper in the surroundings. Be sure that there is a distance of 1 ft, almost 0.30 m, from your lampshade place to the edges. By following all the above instructions, there is still a chance that your spray drifts from your covered area during painting. That‘s why not use the well-furnished rooms or your dining tables. Keep avoiding spraying the paint near your precious things that you don’t want to paint.
Step 6: Spraying The Lamp
Now the most exciting step is to paint the lampshade with spray paint. Pick up the spray paint and start to paint the lamp. Hold your spray from at least 15 cm away from the paint. Press the nozzle press down your nozzle, and start to paint. Spray your paint even if you start from left to right, then go from left to right throughout, and if you start from top to bottom, follow this pattern now. This trick helps you in an excellent finish look of your lamp. Try to Use the light color spray for your lamp. Light color helps you shine your original lampshade. It is the best idea to use acrylic paint spray on the lamps as they‘ll give you the most satisfactory results.
The lamp is ready: Ok, your painted lampshade is ready. Make it dry for at least 2 hours. After drying, attach it to the lamp. Tight the screws properly and bring the shape of the lamp back. Now turn on and turn off the lamp. Repeat the procedure two times and notice that there remains no painted area. Suppose you‘ll feel some uneven spots on the lamp while you turn the lamp on or off. Then remove all the screws and repeat the process from step 1. Apply the second layer of the paint similarly, to how you apply the first layer.
Alternative methods to paint the lampshade
Now it’s time to create the paint on the lamp with paintbrushes. Many people don’t want to use spray or maybe be hesitant, that’s why another method is present, which is by hand and paintbrushes.
Your preparation in this method will be the same as the above process. Your work area and the surface area are the same. But now we are not using hand-painting. So that‘s why you need to have fabric paint acrylic or chalk. Put some water in the cup around your paint tray and paint the lamp with a flat paintbrush.
Let’s start with how to paint the lamp with acrylic paint.
- For creating an even coat on the lamp, you should use straight-up, long, and down brush strokes.
- If you are searching for paint that‘ll give you a solid-looking coat, then it is the best idea to use acrylic paint. Now we can check how to paint lampshades with chalk paint. For a chalky appearance on the lampshade, use chalk paint. Use water with it to have a different look.
- Another painting that you can use on the lamp is fabric paint. Fabric paint gives you the same results as acrylic paint, but they are not too good for painting on the lamp as they are specially for paints.
I hope you have got all the points very well. So, get all the supplies needed and proceed with your full enthusiasm for getting effective results.
Cleaning and Maintaining Your Painted Lamp
Cleaning your painted lamp can keep your home looking fresh. Start by dusting it with a soft cloth to avoid scratches. For dirt, use warm water and mild soap to clean it without harming the paint.
Over time, some areas may need touch-ups. You can use leftover paint for small fixes or try new colors to refresh old lamps. Also, regularly check the cords and connections for safety. By following these easy maintenance tips, your painted lamp will stay a beautiful part of your home for years.
Conclusion:
Painting a lamp is a fun DIY project that can refresh an old item and personalize your space. Every paint stroke changes the lamp and the feel of your room, letting you show your personality. Choosing colors that match your style can make a plain lamp a standout piece.
The process is also enjoyable and promotes mindfulness. By concentrating on each step, from getting ready to the final touch, you embark on a rewarding creative journey. So, gather your materials, let your creativity flow, and see how painting a lamp can brighten your home and offer new ideas for decor and self-expression.

